Automated Developer Machine Setup - Part I - Introduction and DISM
It seems no matter where you work as a developer, the first day or two is all about setting up the company issued laptop with the necessary tools to do the job. Everyone recognizes how much pain in the ass that is, and how much time is wasted doing it. The most typical solution to the problem is "we should make a developer image."
The Problem With Developer Images
The idea of an image is fantastic for most of the employees at any corporation. It guarantees a set configuration. Applications, even internal websites, are tested against that configuration. If those applications happen to work on other browsers or another version of office, great. However, developers cannot have a set image. The tooling is changing so fast. Hell, Visual Studio 2017 keeps asking me to update it every two weeks.
This leads the fundamental flaw in the developer images. It only works as long as you keep it up to date. But that almost never happens. The people creating the image are typically from the operations group, which is completely different than the people using the image, the developers. A new version of Visual Studio is released. Is the image updated? No. Or the latest version of .NET is released. Or the shop decides to switch over to Docker, but the image didn't have Hyper-V installed to support that. So what ends up happening? A machine is imaged for a developer, but this time they are given obsolete tools or a misconfigured machine. The developer, or the person performing the setup, have to figure out which tools to uninstall, or which configurations need to be updated. A step-by-step guide is created to get developers from the base image to a properly configured machine.
The Problem With Step-By-Step Guides
Most developers I've seen try to use an image get fed up with the whole thing and just say, give me a barebones Windows 10 with Office installed; I'll take of the rest. To help make sure they don't miss anything they create a checklist or a step-by-step guide to getting a developer machine setup. This solves the major problem with the image because the developer has to download the latest version of the tooling. But it is a checklist, it requires manual work. Some step will be missed. A tool isn't downloaded or a configuration is missed. For example, when IIS was installed, the developer forgot to include the Windows Authentication module.
The Problem With Virtual Machines
A virtual machine running on VMWare Workstation or VirtualBox could solve some of the problems with a developer image as well as the step-by-step guides. The virtual machine is maintained by the developers instead of operations. The chances of it getting updated are slightly better. A base virtual machine could be created and placed in a shared location. When a developer gets a new machine all they have to do install the virtual software of the companies choosing and pull down the base virtual machine.
But again, who is responsible for updating that base virtual machine? Once developers get their hands on the virtual machine they are going to make customizations to get their experience just so.
The Challenge
So this is where I was a couple of weeks ago. Two developers were getting new Windows 10 machines. Best case scenario, they would be up and running after 8 hours. But that is only if they baby-sat each installer and their meetings that day were few and far between.
This was what each developer had to do:
- Install IIS
- Install Developer Tool suite (Visual Studio, Notepad++, SSMS, etc)
- Install and Configure SQL Server
- Pull Down Source Code
- Create a self-signed certificate for local development
- Setup IIS for each service pulled down from the source code
- Builds each web site
My first inclination was to use Docker for all of this. I soon discovered I had some fundamental misunderstandings about what Docker Provides. Docker is for tools which provide some network interfaces, such as SQL Server, or IIS. It does not work for Desktop Applications such as Visual Studio, Notepad++, or SSMS. Besides, I was still working on a Proof of Concept with Docker. I wanted to represent the current developer machine, not what I have planned months from now.
What I landed on was a series of PowerShell scripts that would perform all the necessary setup. The scripts had to meet the following requirements.
- Multiple smaller scripts with a master control script. Each script is responsible for a specific aspect of setup. The developer would only have to run the master control script. It would know which of the smaller scripts to run and in which order. If we change tool
- Self-Healing, or has the ability to be run multiple times. This way if an install or setup failed at some point the developer didn't have to figure out which of the smaller script to start at.
- Can run on a new machine or it can run on an existing machine. The experience is the same.
- Automatically finds and installs the latest version of all the tools in the developer tool suite. I don't want to have to maintain a set of downloads or remember to pull down the latest version of some tool when its update is released.
- Logging, so much logging, when an error occurs I want to know about it so it can be easily fixed.
This article will cover the first step, installing IIS as well as setting up the Master Control PowerShell Script.
Master Control PowerShell Script
The master control PowerShell script is very simple. It sets the location of the execution to a folder containing all the child scripts and then runs each child script. I called the script "BootstrapDeveloperMachine.ps1." Starting out it looks like this:
Set-Location "<Location Where Scripts are located>"
Install IIS and Hyper-V using DISM
Through my interwebs research, I came across a little-known feature, at least to most everyone I've talked to didn't know about it, built into Windows 8 and above-called DISM. DISM stands for Deployment Image Servicing and Management. It allows you to install Windows features found in the "Programs and Features" application in the control panel. As an bonus it also provides a series of PowerShell cmdlets.
To see a list of features available on your machine run this script as an Administrator in PowerShell.
DISM /Online /Get-Features /Format:Table
Here is the result of running that on my machine.
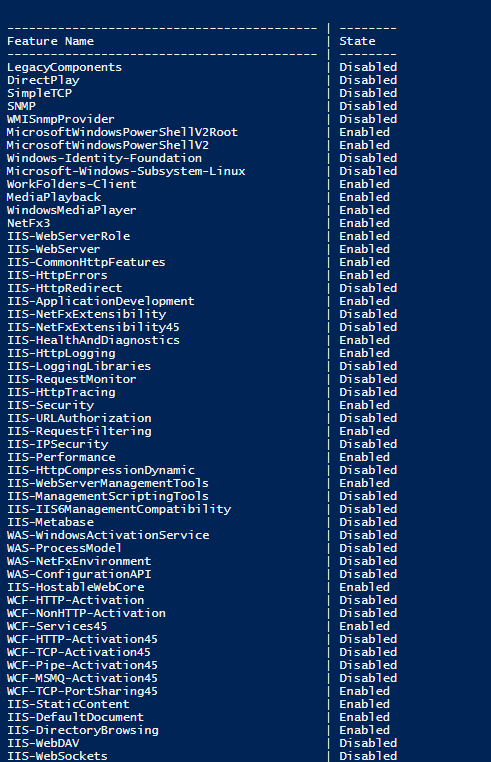
Another nice feature is when you install a package like IIS-ASPNET45 it will go ahead and install all the dependencies.
To install a feature, you just have to run a script similar to this:
DISM /Online /Enable-Feature /FeatureName: IIS-WebDAV /All
In keeping with the smaller scripts responsible for a specific aspect I created a small PowerShell Script called Install_IIS.ps1. That script looked something like this. Please note, these are the features my team needed to do local IIS development, I highly recommend you go through the list provided by DISM's Get-Features functionality and which ones you need.
# Install_IIS.ps1
Dism /Online /Enable-Feature /FeatureName:IIS-ASPNET /All
Dism /Online /Enable-Feature /FeatureName:IIS-ASPNET45 /All
Dism /Online /Enable-Feature /FeatureName:IIS-CertProvider /All
Dism /Online /Enable-Feature /FeatureName:IIS-HttpRedirect /All
Dism /Online /Enable-Feature /FeatureName:IIS-BasicAuthentication /All
Dism /Online /Enable-Feature /FeatureName:IIS-WebSockets /All
Dism /Online /Enable-Feature /FeatureName:IIS-ApplicationInit /All
Dism /Online /Enable-Feature /FeatureName:IIS-CustomLogging /All
Dism /Online /Enable-Feature /FeatureName:IIS-ManagementService /All
Dism /Online /Enable-Feature /FeatureName:WCF-Services45 /All
Dism /Online /Enable-Feature /FeatureName:WCF-HTTP-Activation45 /All
Dism /Online /Enable-Feature /FeatureName:IIS-WindowsAuthentication /All
We ran into a unique issue where we needed to install .NET 3.5 to support some legacy applications. However, our corporate update policy kept blocking the dang thing through DISM. You will notice all those DISM installers are using /Online. You can also mount an ISO image and pull the update from that. The script below will mount the ISO in Windows 10, find the drive you just mounted, install .NET 3.5 from it and then eject the image.
# Install_IIS.ps1 Continued
$windows10Iso = "<Folder of ISO Image>\Windows10_1703.iso"

Write-Host "Mounting $windows10Iso"
$temp = Mount-DiskImage -PassThru $windows10Iso
$imageResults = Get-Volume -DiskImage $temp

$driveLetter = $imageResults.DriveLetter
$driveLetter = $driveLetter + ":"
$drive = $driveLetter + "\sources\sxs"

Dism /online /enable-feature /featurename:NetFX3 /All /Source:$drive /LimitAccess

$driveEject = New-Object -comObject Shell.Application
$driveEject.Namespace(17).ParseName($driveLetter).InvokeVerb("Eject")
I added a call to that script in the "BootstrapDeveloperMachine.ps1." So now it looks like this:
# BootstrapDeveloperMachine.ps1
Set-Location "<Location Where Scripts are located>"

Write-Host "Kicking Off IIS Installer Script"
PowerShell -file "Install_IIS.ps1"
Conclusion
This is just Part I of the series. So far so good, we have the master control script and the first child script. If you created this script and gave them to a developer they would have IIS configured with all the required features. The developer doesn't have to read any step-by-step guide or worry about clicking on the right check-boxes when adding IIS to their computer. All they need to do is run a PowerShell script as an administrator. The total run time on my computer was around 5 minutes.
Next up is installing the developer tool suite.