Build a VM Test Lab using Unraid - Working From Home Part I
Understanding how hypervisors work is key to setting up a test lab on a home server. In this article, read about lessons I learned setting up a VM test lab on Unraid.
I've been working from home since April of 2018 for Octopus Deploy. As expected, working from home is a lot different than working in an office. I'll get into those differences in later posts. What I want to focus on for this post is how I built the infrastructure to help me work from home more efficiently. Specifically, how I built a NAS and a hypervisor to host a bunch of VMs for a test lab.
When I started, I had some fundamental misunderstandings on how hypervisors work. That misunderstanding caused me to end up building two servers. At first, I used Unraid as both my NAS and a simple hypervisor. It was hosting a couple of VMs. This is where my misunderstanding of hypervisors came in. I needed more VMs than I thought my Unraid box could handle. So I built a new computer just to be a hypervisor. For almost a year, I had two servers sitting in my home office.
The funny thing was, I wasn't pushing either box all that hard. Did I really need two separate servers? I had a few weeks off of work, so I decided to work on combining the two into one MegaServer running Unraid. In doing so, I have learned quite a bit about how hypervisors actually work. In this article, I will walk through my thought process, along with the lessons I learned.
Why Unraid Over FreeNAS (for me)
Regardless if I am working from home, my house needs a NAS to share files between computers. I have a desktop for gaming, and photo editing, a laptop for travel, and my wife has a laptop as well. Octopus Deploy provided me with another laptop. Transferring files over USB thumbsticks was becoming a pain. Let's talk about that for a second.
In the past, my NAS solution was nothing more than an external hard drive connected to my Wifi router. That configuration has terrible performance because of multiple bottlenecks. The router hardware, including the processor and RAM (yes routers have processors and RAM), the USB controller in the router, and finally, the single hard drive. On a gigabit wired connection, I would see read/write speeds in the 30 MB/s range. I expect to see read/write speeds in the 110-120 MB/s range. Remember, 8 bits make a byte. A 1000 gigabits / 8 = 125 MegaBytes. Most hard drives running at 7200 RPM should be able to hit at least 80 MB/s, if not 160 MB/s.
In doing some research online, I saw people built a NAS out of old computer parts. In addition to better performance, some solutions could combine multiple hard drives and have them appear as one drive on the network. Most, if not all, had the ability to recover from a drive failure. As an added bonus, some of the solutions could run VMs. I had an old HP Tower, running an Intel Core i7-2600 with 16 GB of RAM and the ability to hold 3 3.5 inch hard drives and 1 SSD. Why not try it out?
Please Note When I say hard drive, I am referring to drives that use disks.
My requirements for my original NAS server were:
- Combine multiple drives and have it appear as one drive.
- Fast file writes and reads.
- Ability to recover from drive failures.
- Support additional features such as TimeMachine (for my wife's Mac).
- Ability to run VMs.
In doing some research, I chose Unraid over solutions such as FreeNAS was:
- Perceived ease of use. For example, adding a new hard drive to the array in Unraid doesn't appear to take as much effort as adding a new hard drive in FreeNas.
- Unraid runs on Linux vs. FreeBSD for FreeNAS. I needed to learn Linux to help customers at Octopus Deploy, so this was a bonus for me.
- Learning Curve. Back to the ease of use, but combined with the community and videos made about Unraid, makes it appear easier to get going quickly.
I know there are FreeNAS fans out there that would refute each of those points. In watching some videos on YouTube, Unraid appeared to meet my needs and looked easier for me to learn. FreeNAS was on my list if I couldn't get Unraid to work. I'm not saying Unraid is better than FreeNAS, only that I got Unraid working quickly, so I didn't see the need to dive into FreeNAS.
I've seen some other comments which state, "all NAS MUST HAVE ZFS and Unraid doesn't support ZFS as the default file system. ZFS is fast and has data integrity built-in." I understand where they are coming from. I had a set of requirements, which both ZFS and Unraid provided. Unraid met the requirements differently, but it made sense to me, and it was easy for me to get up and running.
A Brief Intro to Unraid
How Unraid works is it will build what is essentially a RAID 4 array, but using software.

What this means is one drive is lost to parity. If you have three hard drives, then it will combine two hard drives, so it appears as one drive, with one drive used as parity. The cool thing is each drive can be a different size.

The parity drive's capacity has to be >= the max hard drive size in the array. For example, if you have a 4TB hard drive in the array. The parity drive storage has to be >= 4 TB. I chose 3TB for all drives because it was easier (and they were on sale).
There is a good chance multiple computers will need to write to the NAS. sYes a 7200 rpm hard drive can write between 80 MB/s and 160 MB/s, which is perfect for a person using it. Not so much for multiple users. SSDs are much faster with a lower capacity for the same price. Unraid has the ability to create a cache pool of multiple SSDs, which uses btrfs or butter fs. The cache pool will be written to first. Unraid will move those files over to hard drives. All this is transparent to the users.
With 2 or more SSDs, Unraid will combine all of them and create what looks like a RAID 1 array.

This is done with software, not hardware. It isn't exactly a RAID 1 array. Unraid will combine all the storage across all SSDs and divide it by 2. In the screenshot below, I have three 1TB SSDs. Which works out to be 1.5 TB for the cache pool.

Building the hypervisor server
I had an Unraid box working and hosting files. Great. To help better understand Octopus Deploy, specifically the High Availability functionality, I set up some VMs in Unraid. As time went on, the VMs then started doing double, triple, and eventually quadruple duty. The i7-2600 processor has 4 cores and 8 threads. In Unraid, each VM had 2 cores / 4 threads pinned to it with 7 GB of RAM. The quadruple duty didn't scale all that well. More use cases kept popping up. Customers using Linux. Customers using Oracle or MySQL. The simple fact of the matter was I needed more VMs.
But I didn't understand how hypervisors worked. So I made the mistake of building a new server just to host more VMs. I'll go over the parts I used later. Let's just say the hypervisor server had some serious horsepower (12 cores/24 threads and 128 GB of RAM).
I had the following VMs configured:
- Domain Controller
- SQL Server
- Octopus 01 (for configuring Octopus in HA Mode)
- Octopus 02
- Dev
- Test
- Stage
- Prod
- Worker
I liked using Hyper-V. I liked the dynamic memory feature. I liked the ability to install a separate NIC and use that for VMs only. Didn't have to mess around with virtual network adapters in Hyper-V by doing that.
What I ended up with was different systems hosting VMs. I had to remember which one is hosting which VM. On top of that, I couldn't get remote Hyper-V management to work right. I suspect it is a combination of my lack of experience, Windows 10 functionality, and some other voodoo. To manage the VMs running in Hyper-V, I'd have to remote into the host. A bit nit-picky but not the end of the world.
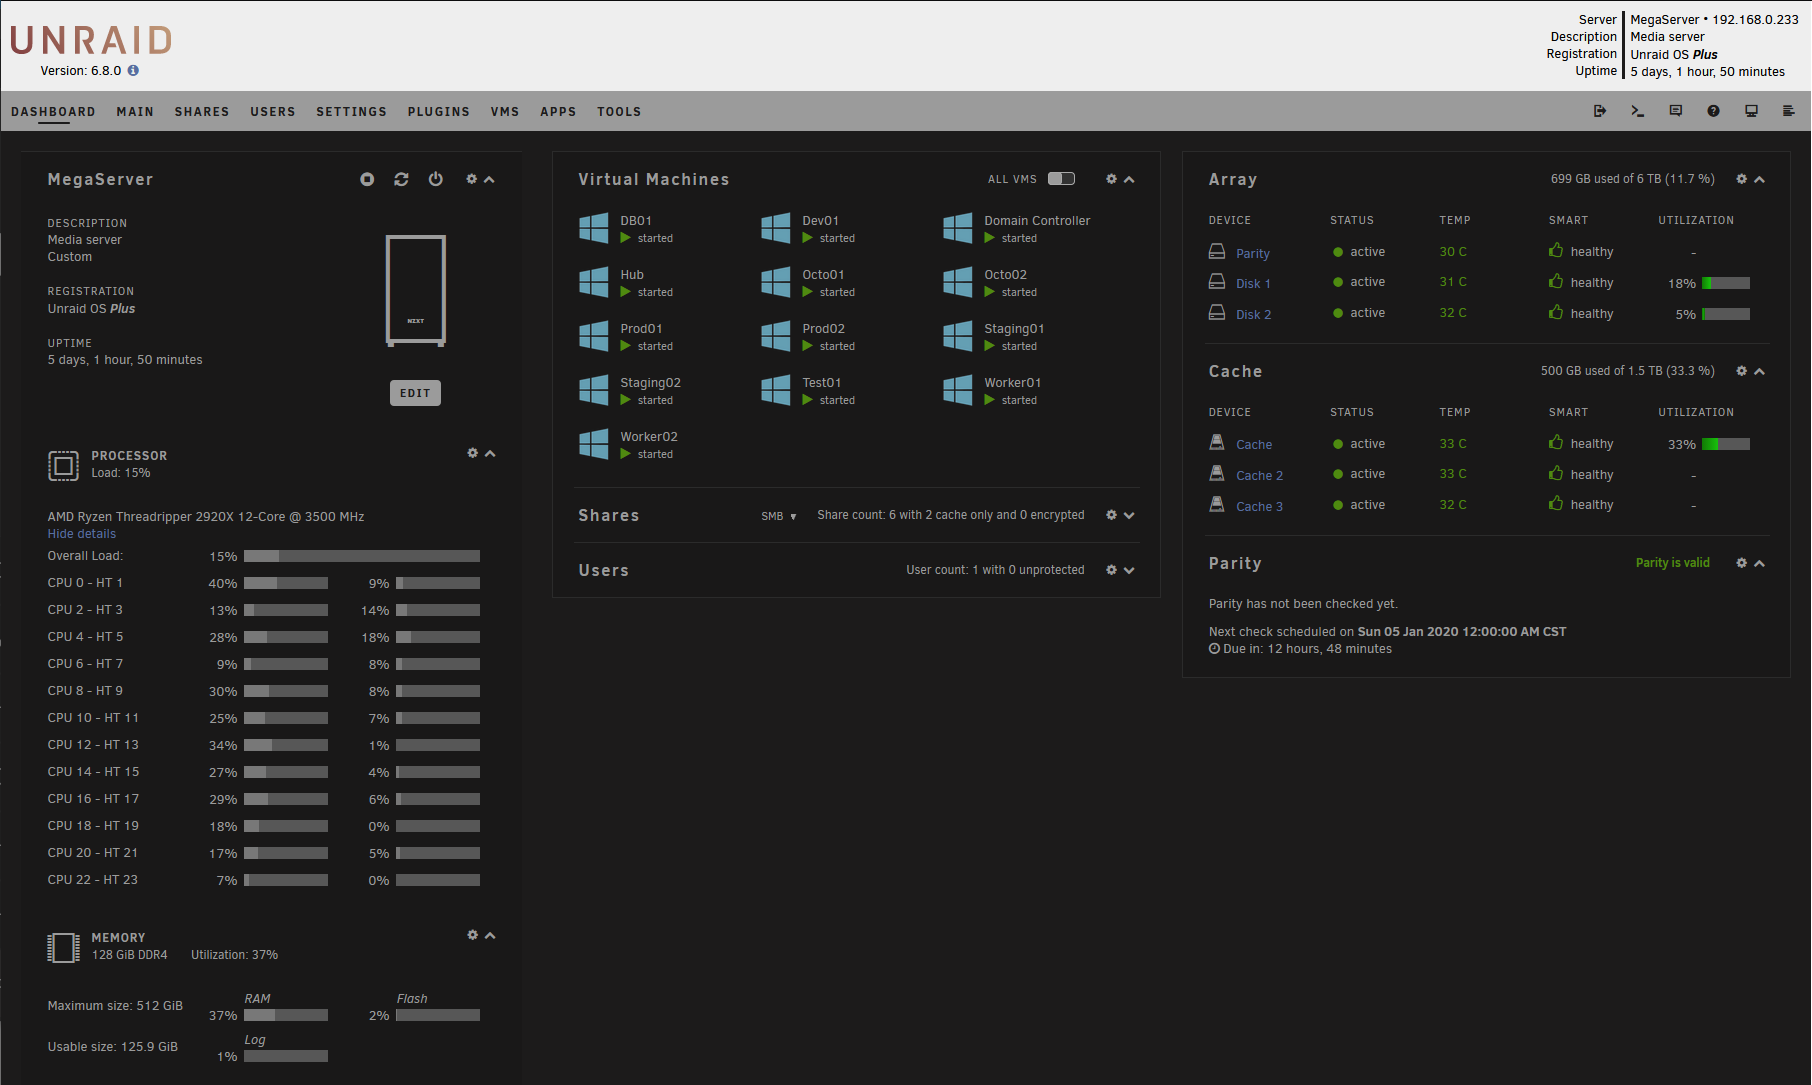
I started noticing something interesting. When I'd remote into the host to manage Hyper-V, the total committed memory was never above 40%, and the CPU usage was around 10%-15%. Despite having 12 TB of storage in Unraid, I was only using 400 GB. Unraid was also reporting low CPU usage. I didn't know about dynamic memory in Unraid, so the memory was set to 7 GB, but even then, 9 VMs * 7 = 63 GB of RAM. I could give more to SQL Server, so let's say an even 80 GB max.
Why not use AWS, Azure, or GCP?
If I had comments turned on for this website, I could already imagine the first ones. "You know, you could host all those VMs in AWS or Azure or GCP. They also provide file storage. That is what the cloud providers are designed to do." You're right imaginary person, I could do that.
Here is a fun fact about cloud providers, they are expensive. Let's say I use burstable instances in Azure. They are relatively inexpensive. But I also need a file storage solution, let's be generous and assume I only need 500 GB.
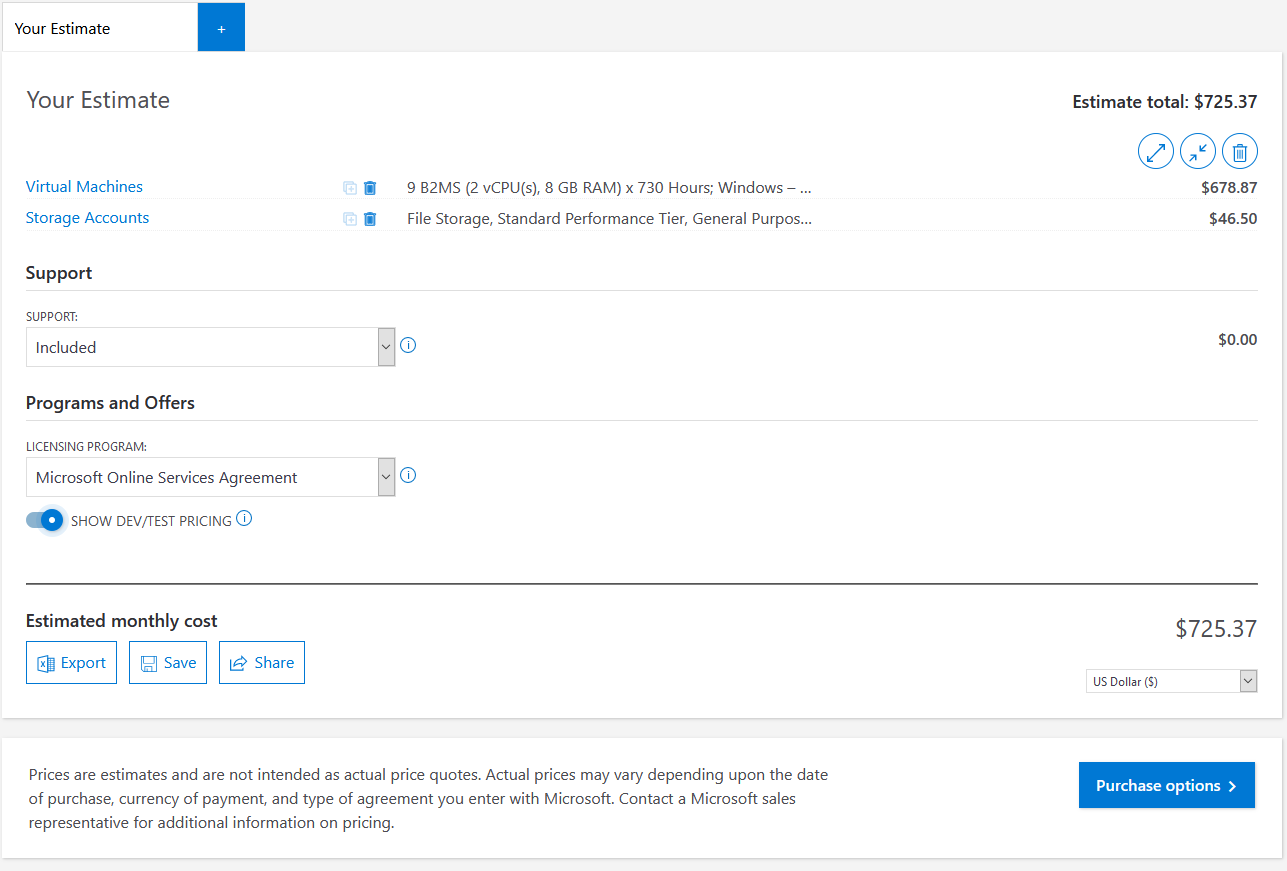
Okay, so I'm looking at $725 USD / month, or $8700 / year. One of the things I love about working for Octopus Deploy is they are willing to spend that money if it makes me more productive. But I would feel guilty about it. At the time of this writing, my team has 8 people. If everyone did that, the cost would be close to $70K USD.
Costs like that trigger another conversation. We could combine Dev/Test/Stage into one VM. Or not have a worker. The DC could also host SQL Server.
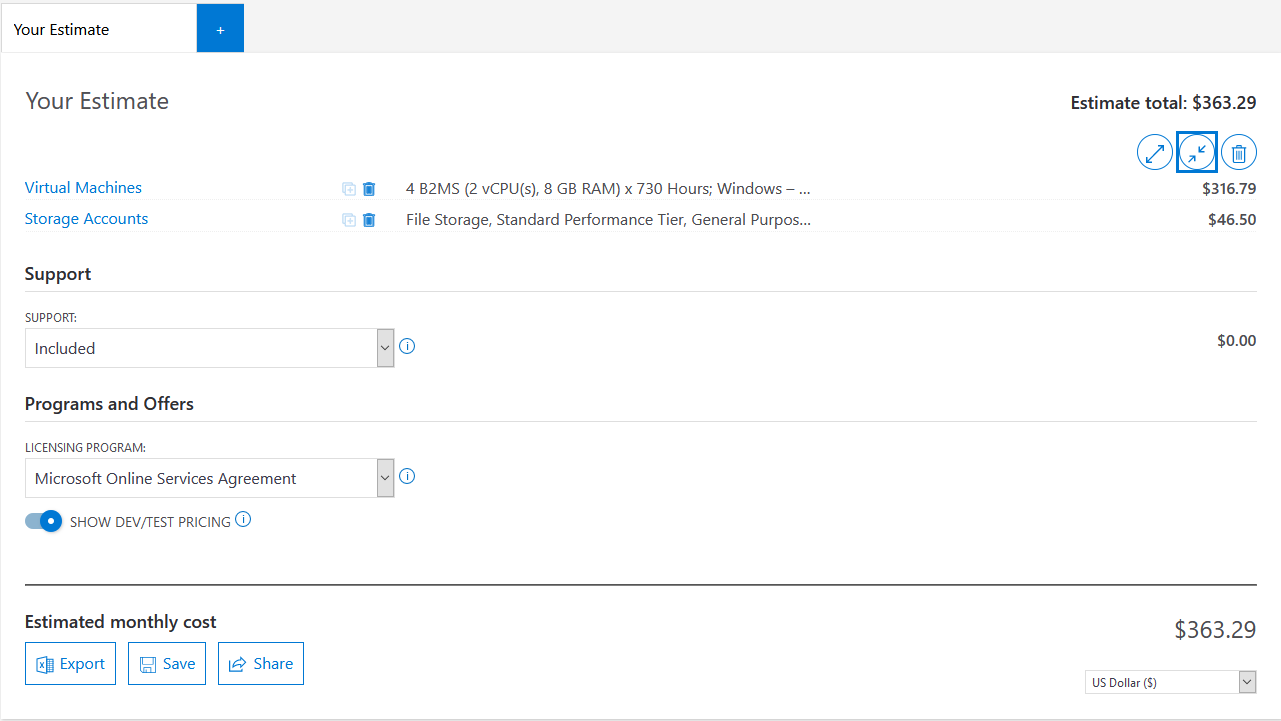
Now we are down to $363 USD / Month, or $4,356 USD / year. For the team, it would be around $35K USD / year.
People on the team could share VMs (but work hard not to step on each other's toes). I'm not a big fan of that, as someone could be changing the configuration of a VM to help one customer while another person is trying to give a demo. Even when they're only two people on the team, that happened a lot more than I thought was possible. We could use IAC to tear down and spin up VMs each day. Both of those have additional hidden costs, namely the salary of people to write the IAC, along with the lost time when folks step on each other's toes.
I prefer to use the right tool for the job. In this case, the right tool is running the hypervisor locally.
Building MegaServer
It made sense to combine the servers. I chose Unraid as the host over Hyper-V because I still needed a NAS solution. I liked Unraid's ability to combine hard drives and have it appear as one. I'm sure I could get that to work in Windows, but that was core functionality in Unraid. And it has a web interface to manage VMs. No more remoting into the hypervisor to manage VMs.
There was one kicker to the whole thing. Each case had a max of 6 drive bays. I wanted all the VMs to run on SSDs. I had two SSDs in the hypervisor. The Unraid box had 5 Hard Drives plus 1 SSD, which meant I had to lose 2 hard drives from the array in Unraid. Not a big deal, as I was only using 400 GB of space. I picked the two drives without anything on them and removed them. This was a bit tricky as I had to:
- Stop the array.
- Go to Tools -> New Config and create a "new array" but retain the configuration of the old one.
- Exclude the two drives from the array.
- Spin back up the array.
- Wait for the parity drive to be re-built (for me this took 5+ hours).
Once that was done, I could get to work combining the two servers. The server specs (at the time of this writing) are:
- AMD ThreadRipper 2920x (12-core/24-thread). I chose this over the 3900x because it was available, on sale, and I made a mistake thinking AMD would not create a new socket for ThreadRipper 3. One bonus is most motherboards have 8 DIMM slots.
- 8x16GB sticks of Corsair Vengence LPX 3000 Mhz for a total of 128 GB of RAM. ThreadRipper 2nd gen doesn't support memory faster than 2933 Mhz.
- Gigabyte X399 Auros Pro
- 3x3TB Western Digital Red
- 3x1TB Samsung 860 EVO
- AMD Radeon 550
- 850 Corsair RMX 80+ Gold fully modular power supply
- NZXT Kraken X52 All-in-One Water Cooler
- NZXT 710 for the Case
- 5x120mm Be Quiet Fans
- 1x140mm Be Quiet Fan
- Intel 1 Gigabit NIC
You can see all the actual parts on PC Part Picker. At the time of this writing, those parts could be bought for around $2700 USD.
Hypervisor Lessons Learned
Like most Linux distros, Unraid uses KVM as the virtualization host. Unraid provides a nice GUI on top of it. When I started configuring the VMs, I thought that once you allocate resources to a VM, they are dedicated just to that VM. So if I allocate 2 CPUs to a VM, those CPUs cannot be used by other VMs. With that incorrect thought, I started configuring my VMs:
- Domain Controller - 1 core/2 thread, 16 GB of RAM
- SQL Server - 2 cores/4 threads, 24 GB of RAM
- Octopus 01 - 1 core/2 thread, 8 GB of RAM
- Octopus 02 - 1 core/2 thread, 8 GB of RAM
- Dev - 1 core/2 thread, 8 GB of RAM
- Test - 1 core/2 threads, 8 GB of RAM
- Stage - 1 core/2 thread, 8 GB of RAM
- Prod - 1 core/2 thread, 8 GB of RAM
- Worker - 1 core/2 thread, 8 GB of RAM
With my incorrect way of thinking, I had allocated 10 cores/20 threads of my 12 core/24 thread CPU. I had also allocated 96 GB of 128 GB of RAM. With this mindset, I could only add 2 more VMs before running out of cores. Or, allocate 32 more GB of RAM.
The RAM was my first worry, as that is the max the board supports. I looked at AWS and Azure VMs with similar specs, and I noticed a lot of them were "2 vCPUs and 4 GB of RAM." So I scaled back the Octopus VMs, along with Dev, Test, Stage, and Prod to 4 GB.
I had more RAM, but now I was limited by the CPU. I should upgrade to a 16 core/32 thread or 24 core/48 thread CPU to add more VMs, right? Wrong.
Think about this for a second. I am using one NIC for all my VM network traffic. I don't have 9 NICs in my server. They are sharing a single resource. On top of that, the majority of my VMs are dormant most of the time. Hypervisors are smart. They provide the ability to share the same resource. The same 1 core/2 thread CPU could be allocated to more than one VM. And just like Hyper-V, KVM supports dynamic memory, which it calls memory ballooning.
Please Note: What I am about to recommend isn't something I would configure in production and/or multi-user configuration without extensive performance testing.
In other words, I thought I was using 83.3% of my available CPU resources. But I'm not. With some tweaking, I can more effectively use those resources. I could start spinning up more VMs to build out a proper test lab. For example, I could have 2 "Prod," 2 "Stage" servers, and 2 workers, plus a build server hub.
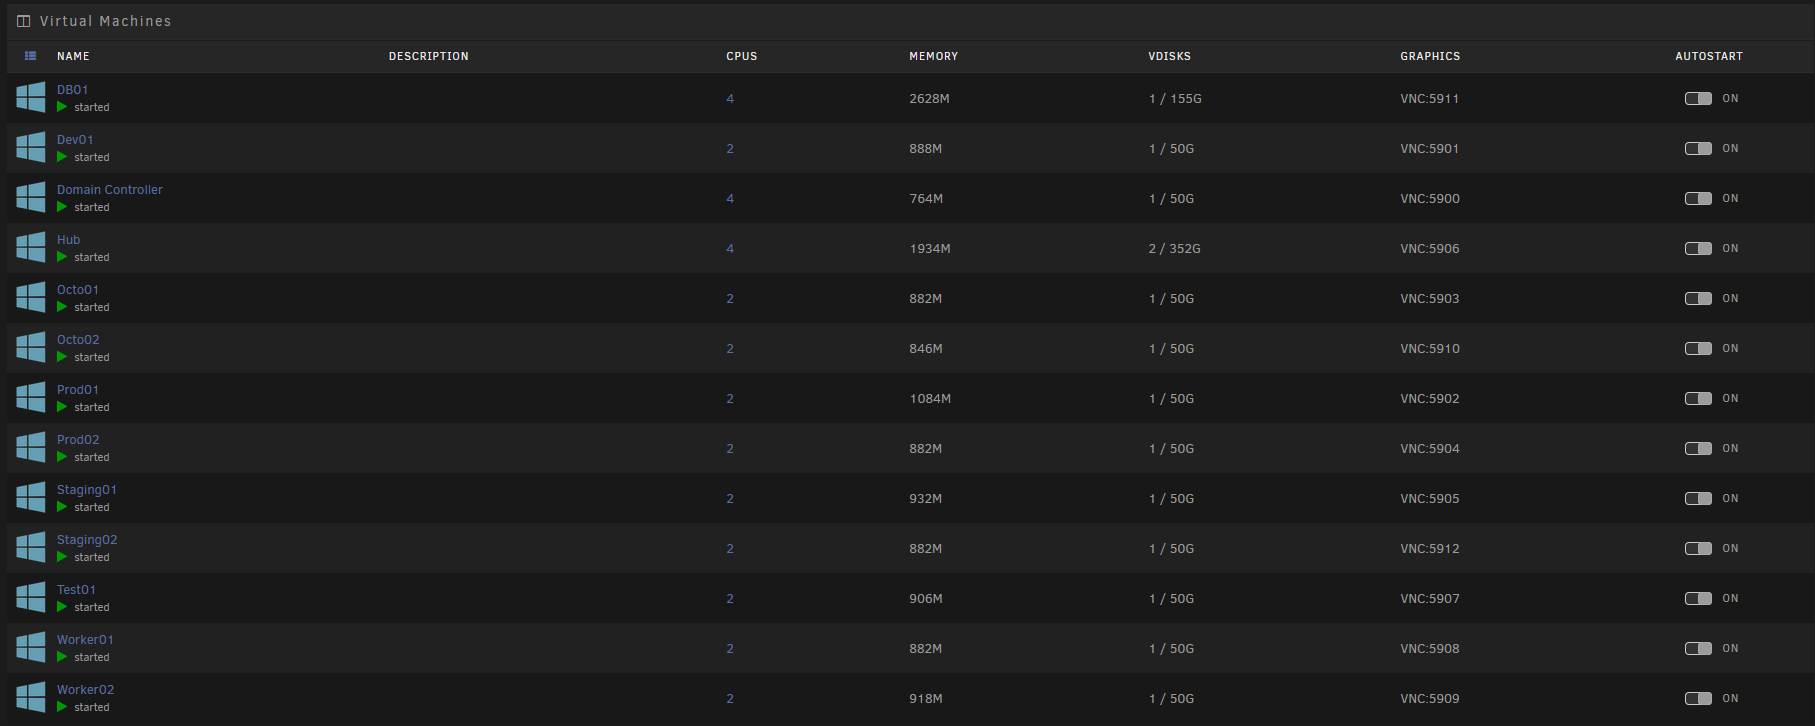
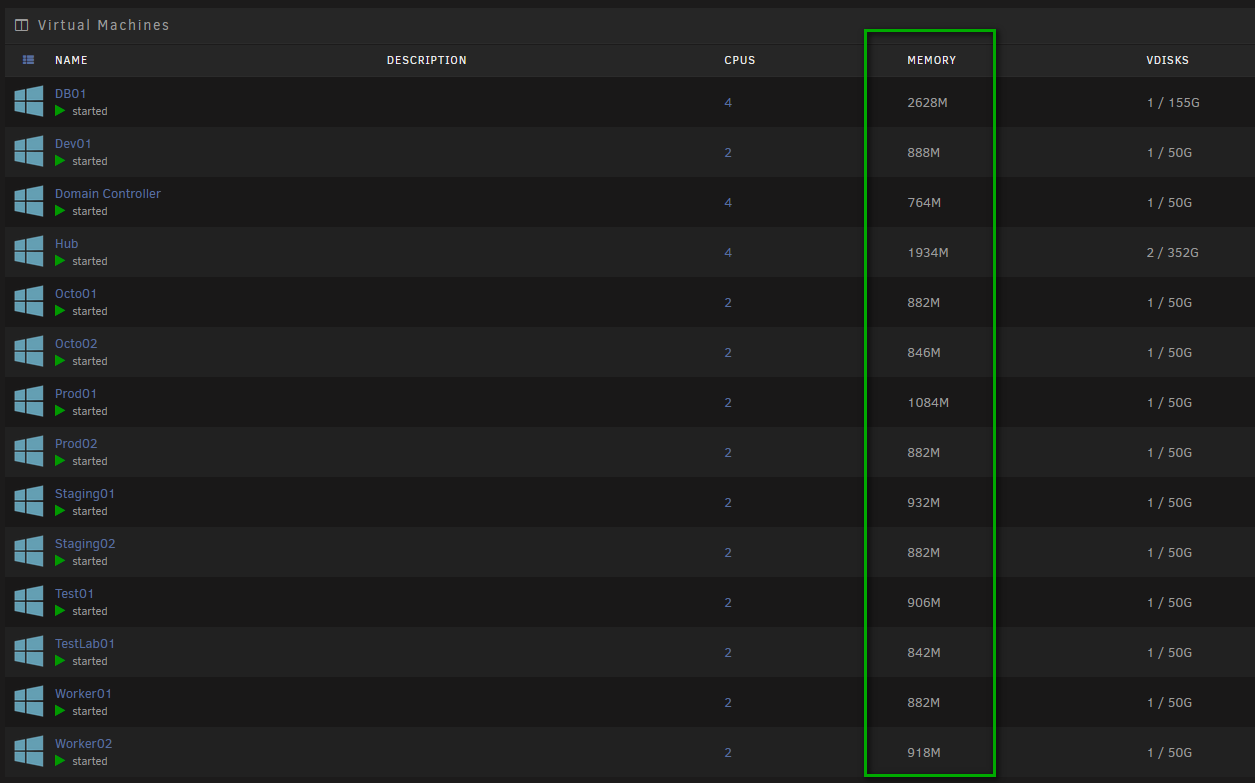
You'll notice the dedicated memory to each VM is a little odd. That is because each VM has a min of 128 MB of RAM and max between 8 GB and 24 GB. I am leveraging the dynamic memory functionality in KVM.
Even with those extra VMs, I still have 3 cores/6 threads open for additional VMs.
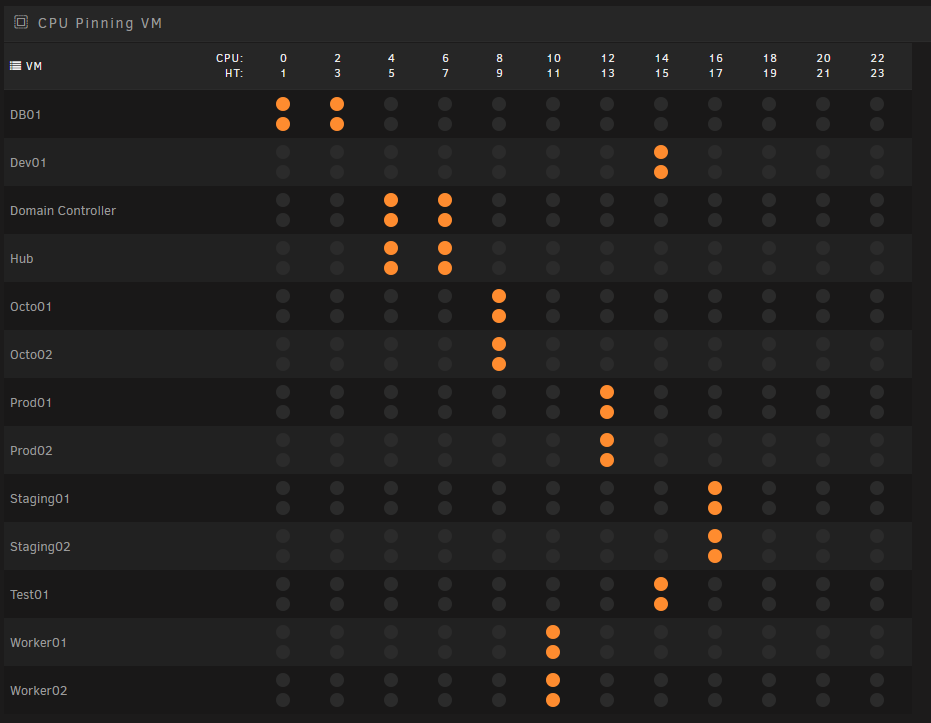
Even when the VMs are idle, they are still doing work. And 13 VMs still will consume some amount of memory.
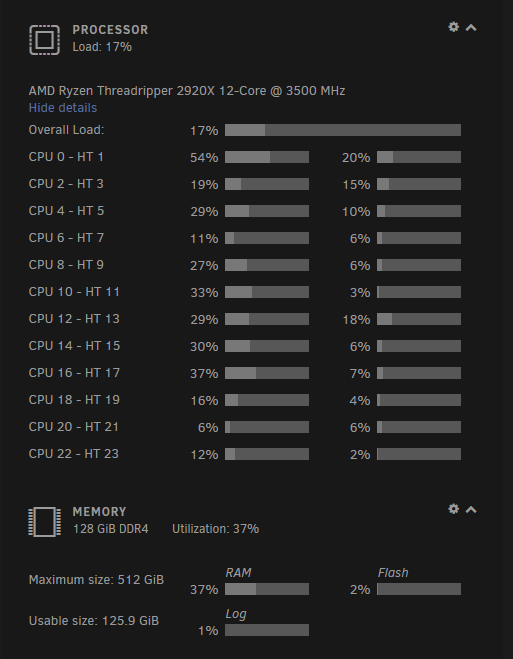
This doesn't mean I can go nuts with the number of VMs. I do have a finite amount of resources. I will hit a wall at some point. After all, this is a home server sitting on a shelf in my office, not a rack-mounted server in a data center with 64 core/128 thread CPU and 3 TB of RAM. The point is I wasn't using what I had to its fullest potential.
Step-by-step guide to configuring a VM in Unraid
I've talked a lot about "what" I configured. Not "how." Here is how I configured a Windows VM in Unraid.
Prep Work
There is a bit of prep work. We need to prep the share, configure the network interface card, download the ISO, and turn on the VM Manager.
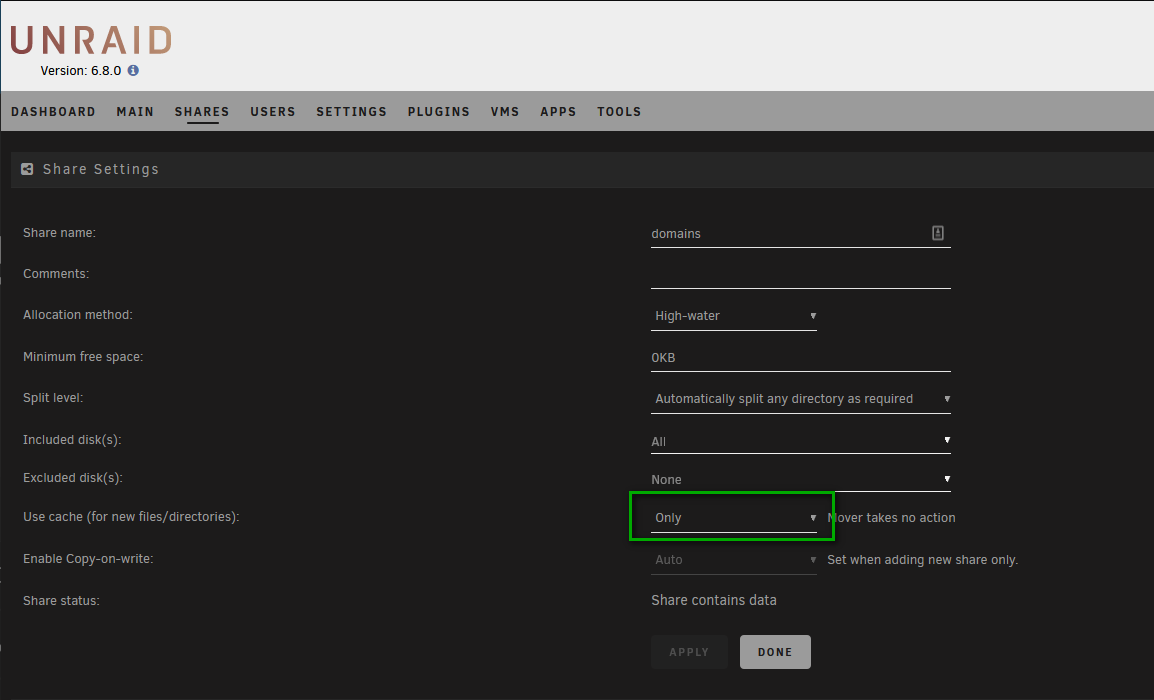
First, let's prep the share. I have a cache pool of 1.5 TB. I want to host all my VMs on that cache pool. Hosting in the array will lead to disk I/O bottlenecks. To do that:
- Go to the domain share in Unraid by clicking on the
Sharestab. - Click on the
domainsshare. - Change the
Use Cacheoption toOnly.
Now when new VMs are created, the disks will be created on the cache pool.
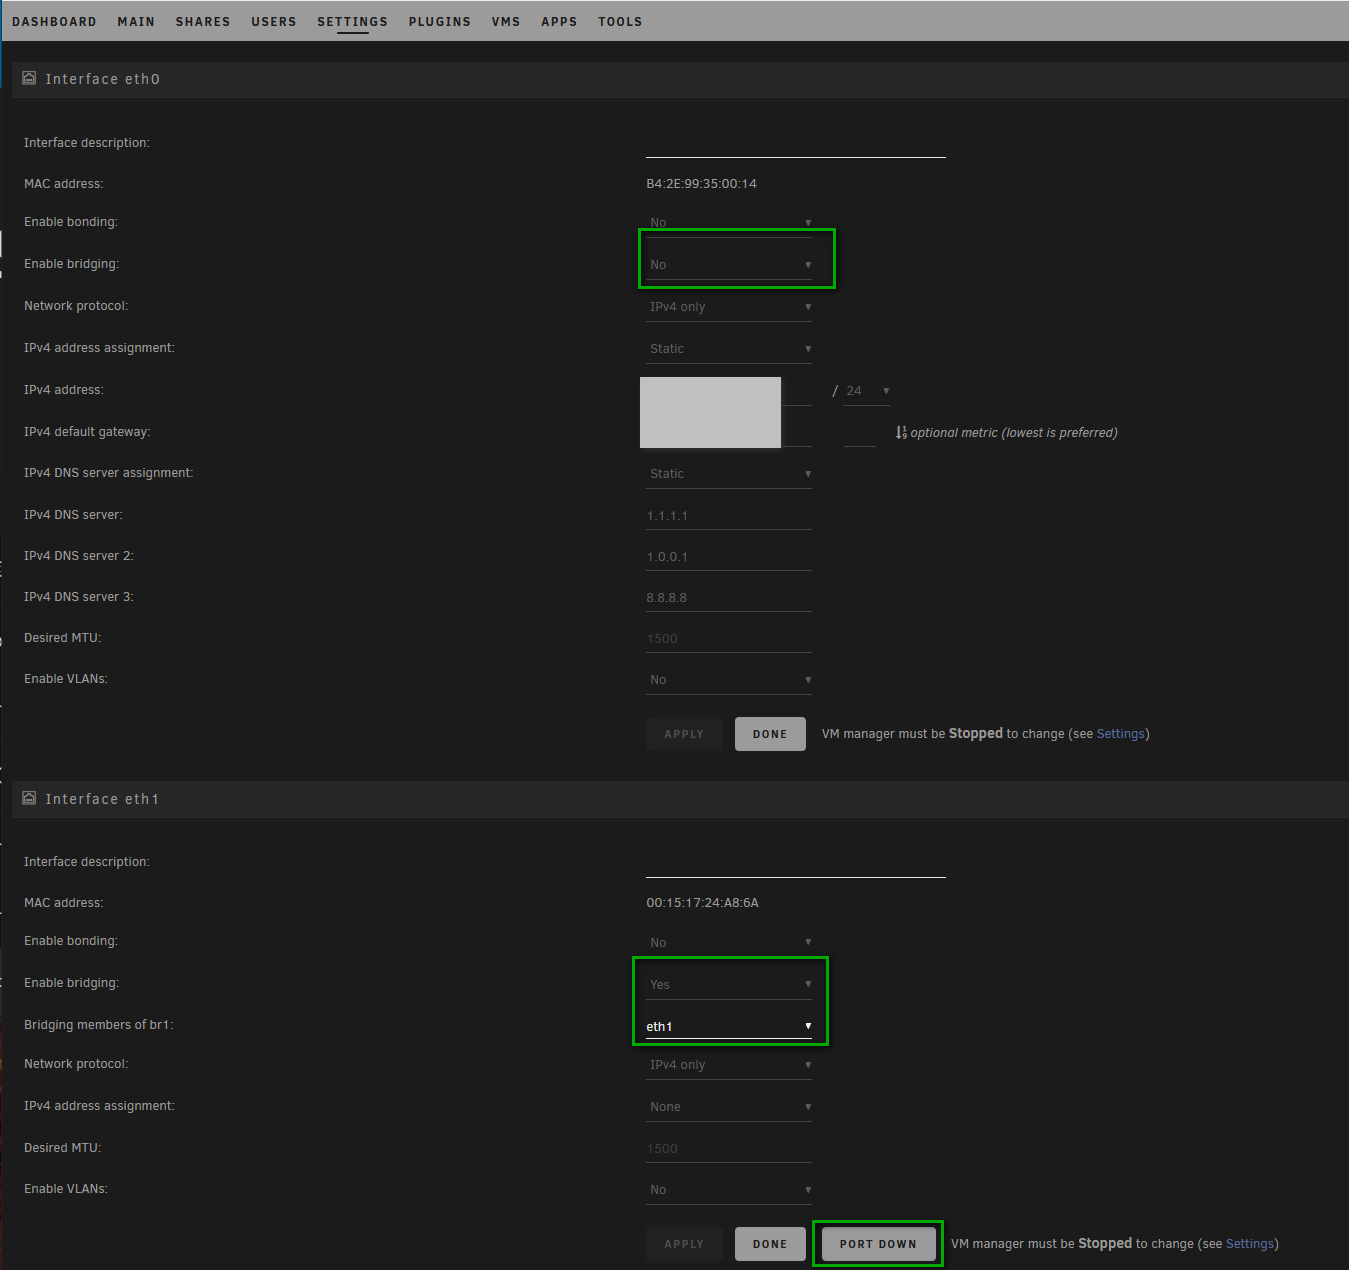
Next, we will want to set up the NIC for the VMs to use.
- Click on
SettingsandNetwork Settings. - You might see a warning that network changes can only be changed when the Docker Manager and VM Manager are turned off. Go to each of those settings and disable them.
- Most motherboards have an onboard network interface, which is marked as
eth0. We will use that for file sharing only. Set theEnable Bridgingto no. - The NIC will show up as
eth1, and that is the one we want to use for VM connections. SetEnable BridgingtoYesand ensure onlyeth1appears as the members for that bridge. - Click the
Applybutton. - You should see the
Port Downbutton. If you seePort Up, that means the port is disabled, and you need to turn that on.
Next up, we need to make sure the VM manager is up and running. Go to Settings then VM Manager and ensure Enabled is set to Yes.

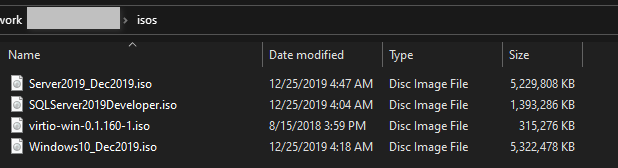
Finally, download the Windows ISO you intend to use and put it in the isos share.
Creating the VM
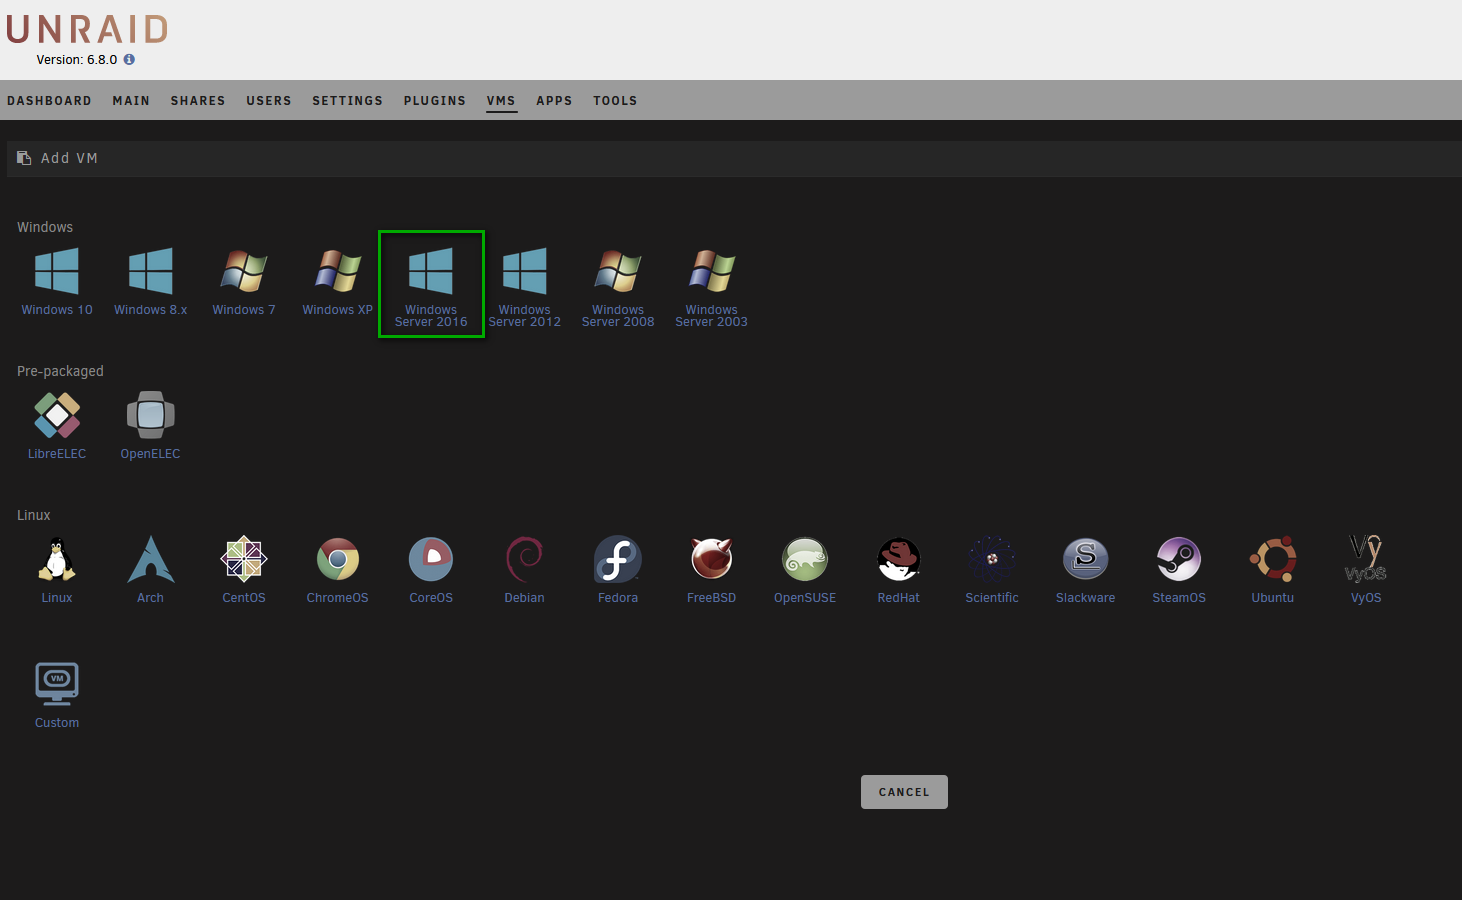
With that prep work done, we can now create the VM. I'll be creating a Windows Server 2019 VM, but the same instructions can be used for Windows 10, Windows Server 2016, and so on.
First, click the VMs tab and then click the Add VM button. You will be presented with the Add VM screen. I'm building Windows Server 2019, but only 2016 appears, no worries, click the Windows Server 2016 button.
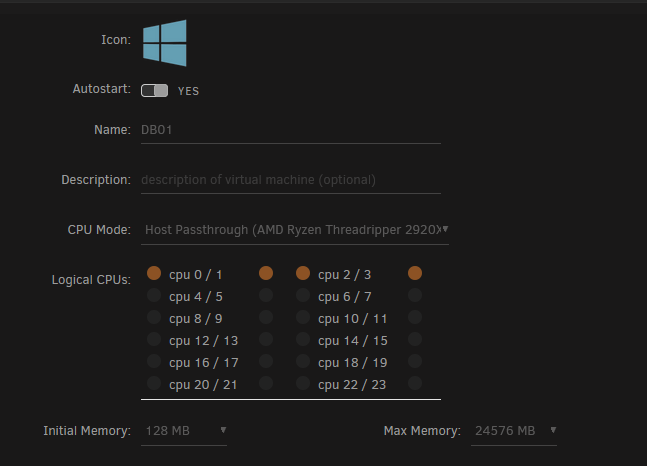
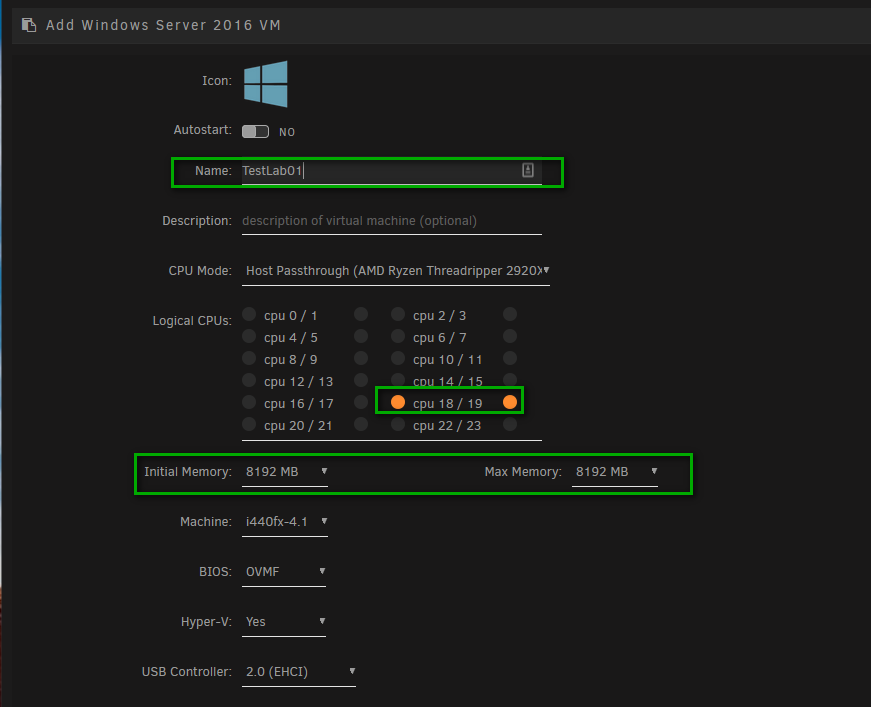
Once that button is clicked, the screen will change, and we can set resource options. First, name the VM. CPU pinning it is a good idea to set a core/thread pair. In my case, 18/19 show up together. With some CPUs, they show up as 0/4, 1/5, 2/6, and so on. I'm going to set my memory to 8 GB (for now).
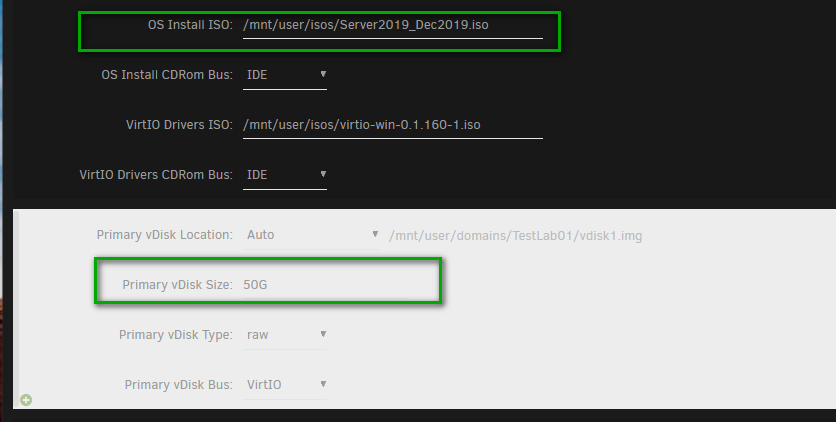
Next are the disks to provide the VM. First is the install ISO, the driver ISO (which has been pre-selected for you), and then the vDisk you will be installing to. Unraid uses auto-growing images. Even though I tell it 50G (for 50 GB), it will only take up space as it is written to.
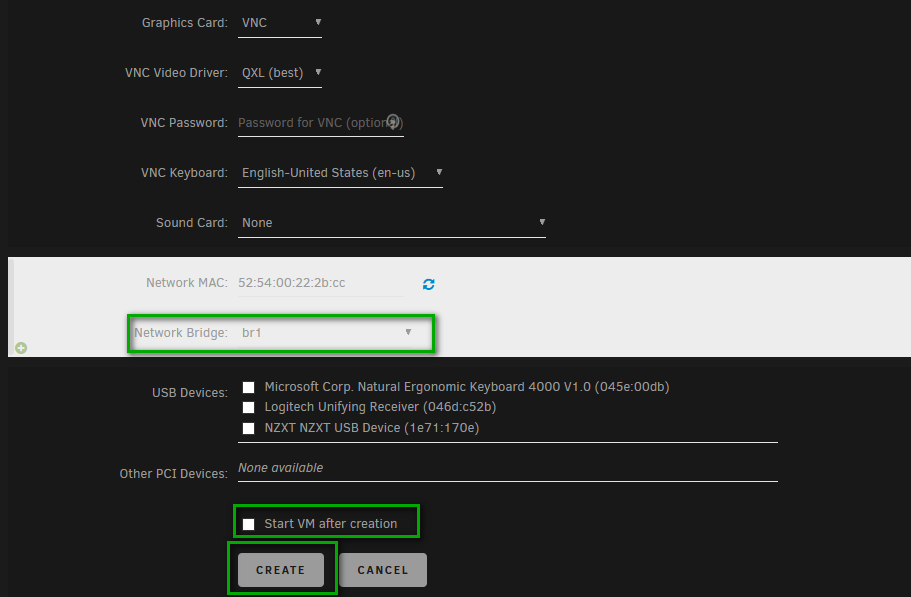
Finally, we get to the connectivity section. Unraid connects to VMs using VNC. We will want to select the network bridge we created earlier. Uncheck the Start VM after creation option as that will cause problems in a minute. Finally, click the create button.
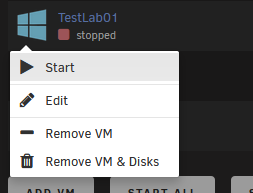
Now we have a VM ready to roll. On the next screen, click the VM icon and select Start VM, it should start quickly.
As soon as the VM shows started, connect to it via VNC. I'm not joking around, do this right away. If you don't, you'll miss the Click any button to boot from DVD... prompt.

If you miss the prompt, shut down the VM, and start again. You'll know when you miss it because you'll be presented with a weird-ass screen, which doesn't make sense when you connect via VNC.
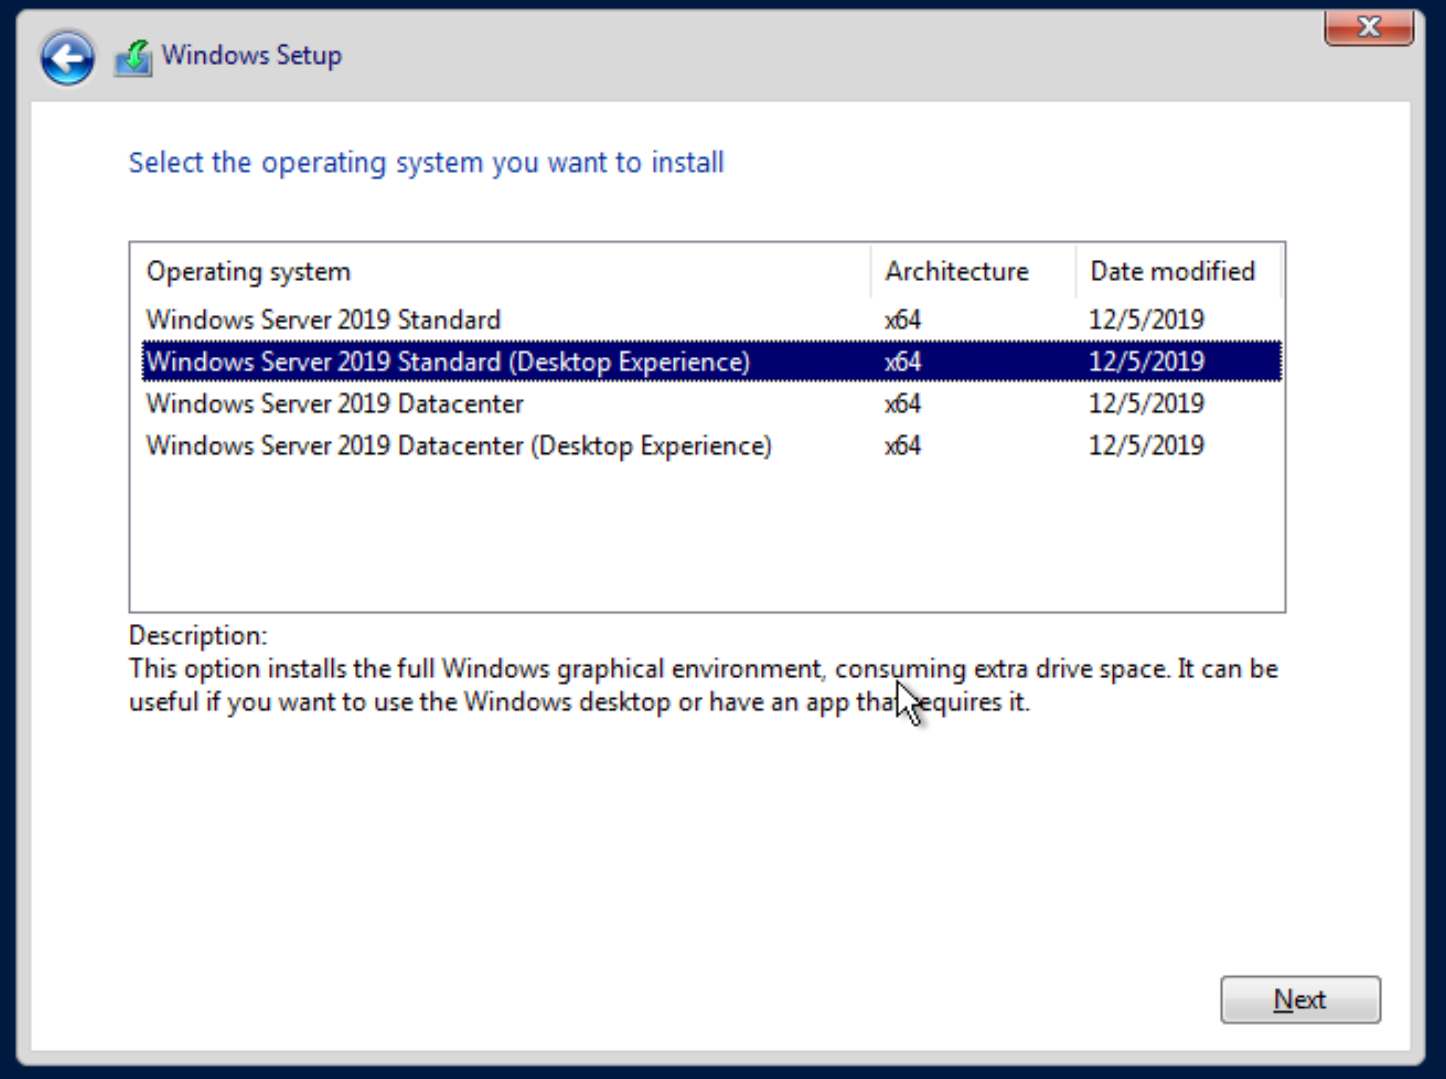
If you're installing Windows Server, be sure to select the Desktop Experience if you want a GUI. Otherwise, you will install a headless server.
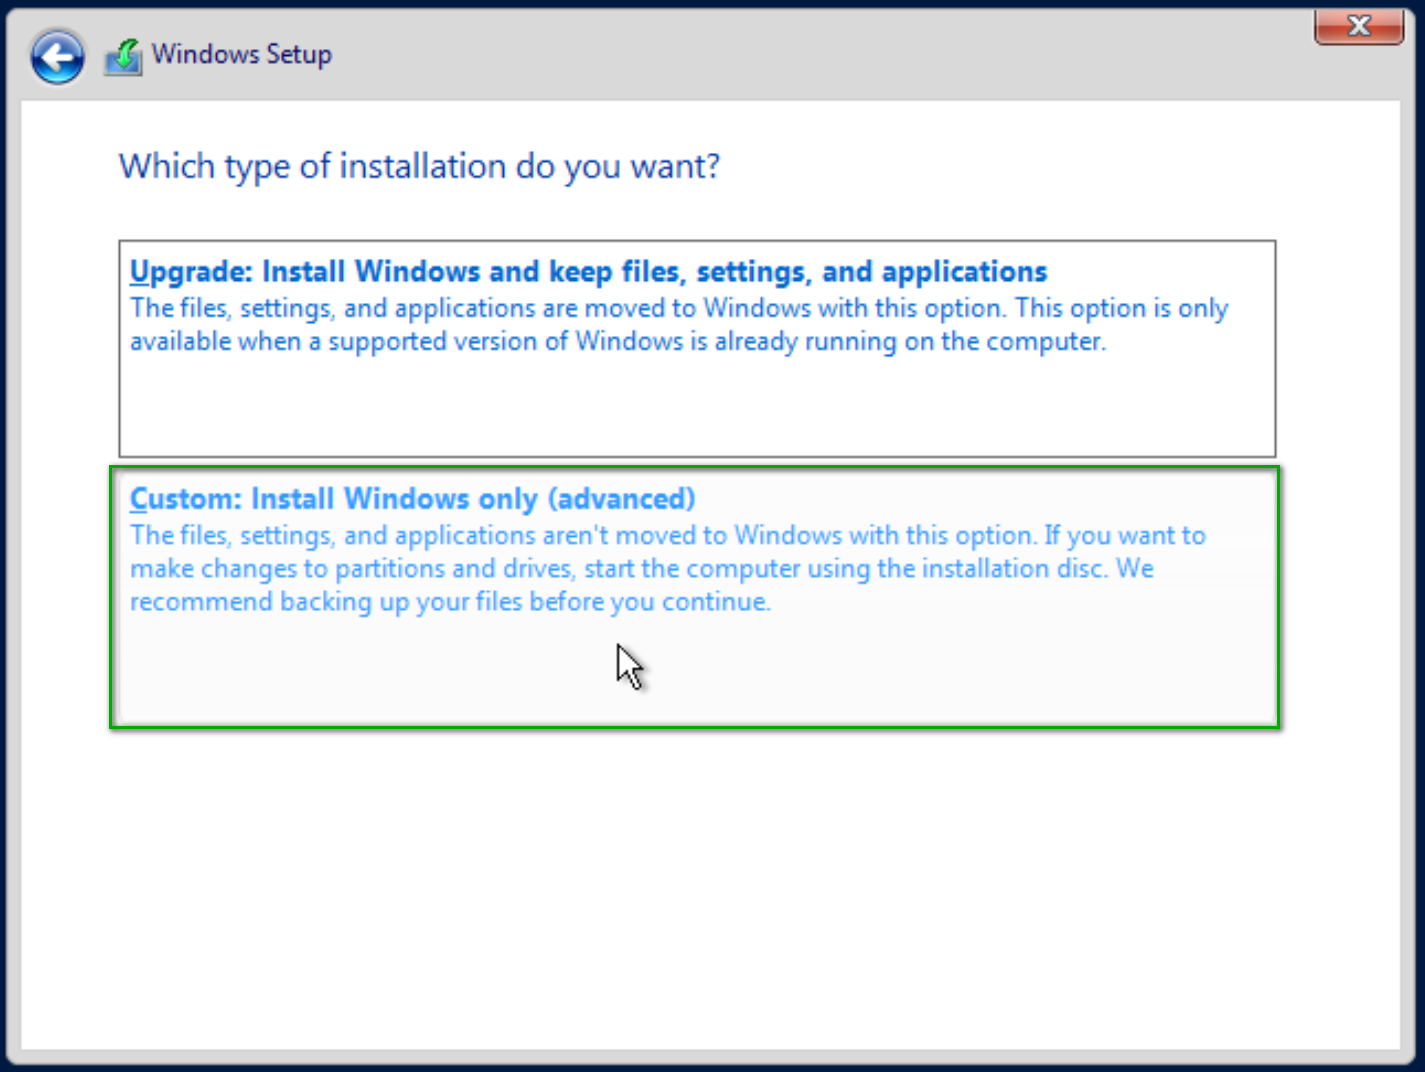
Select the Custom option.
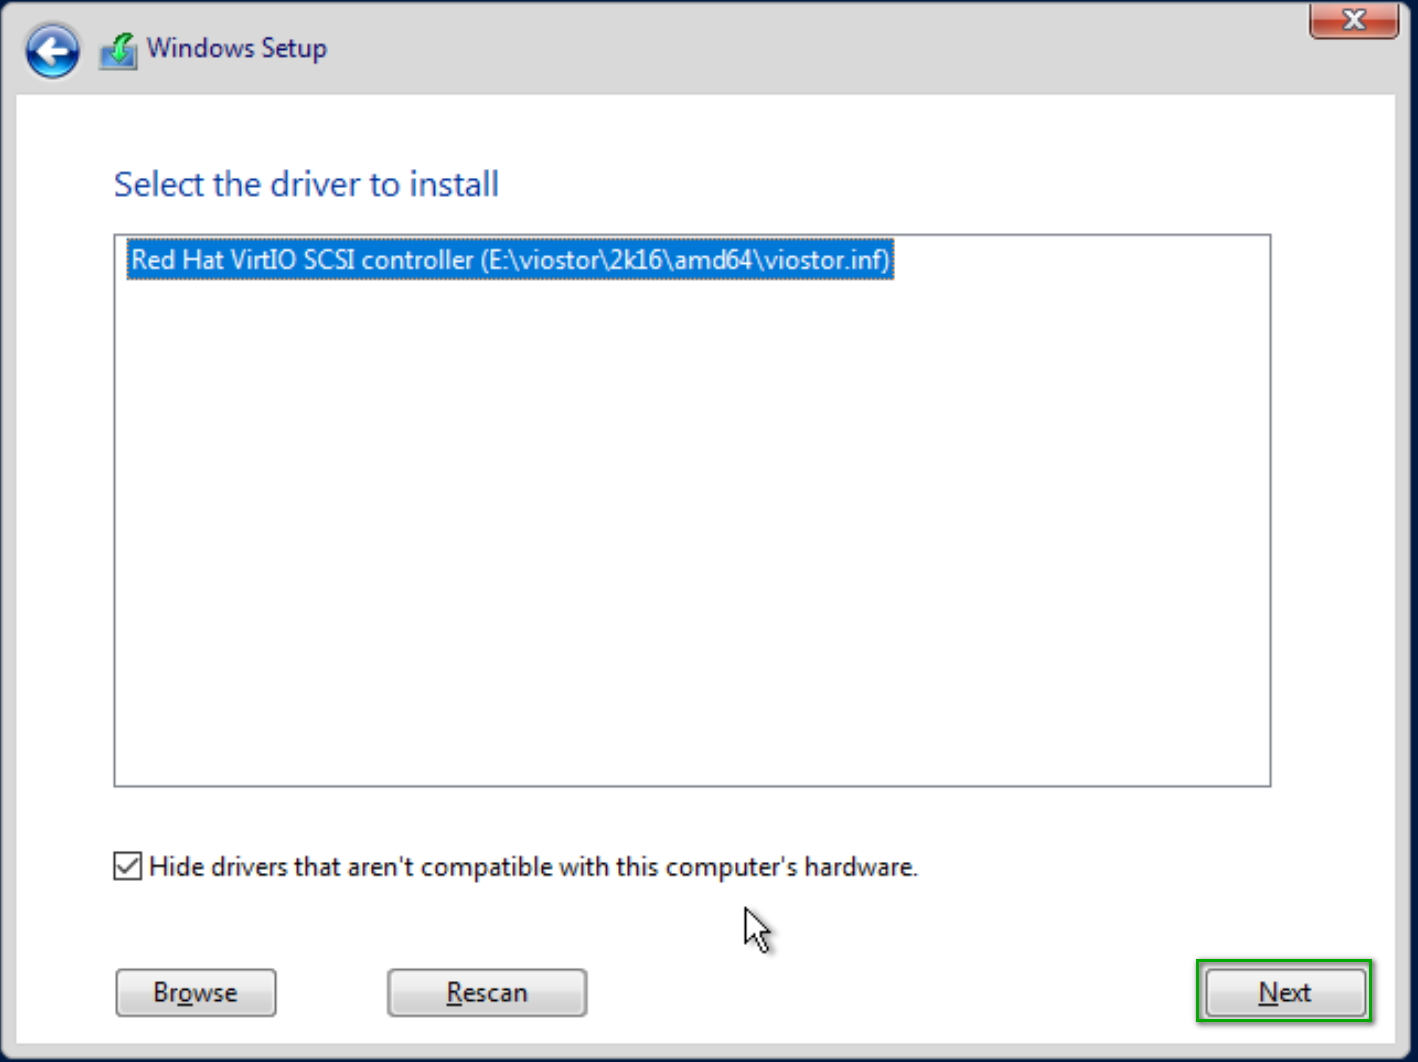
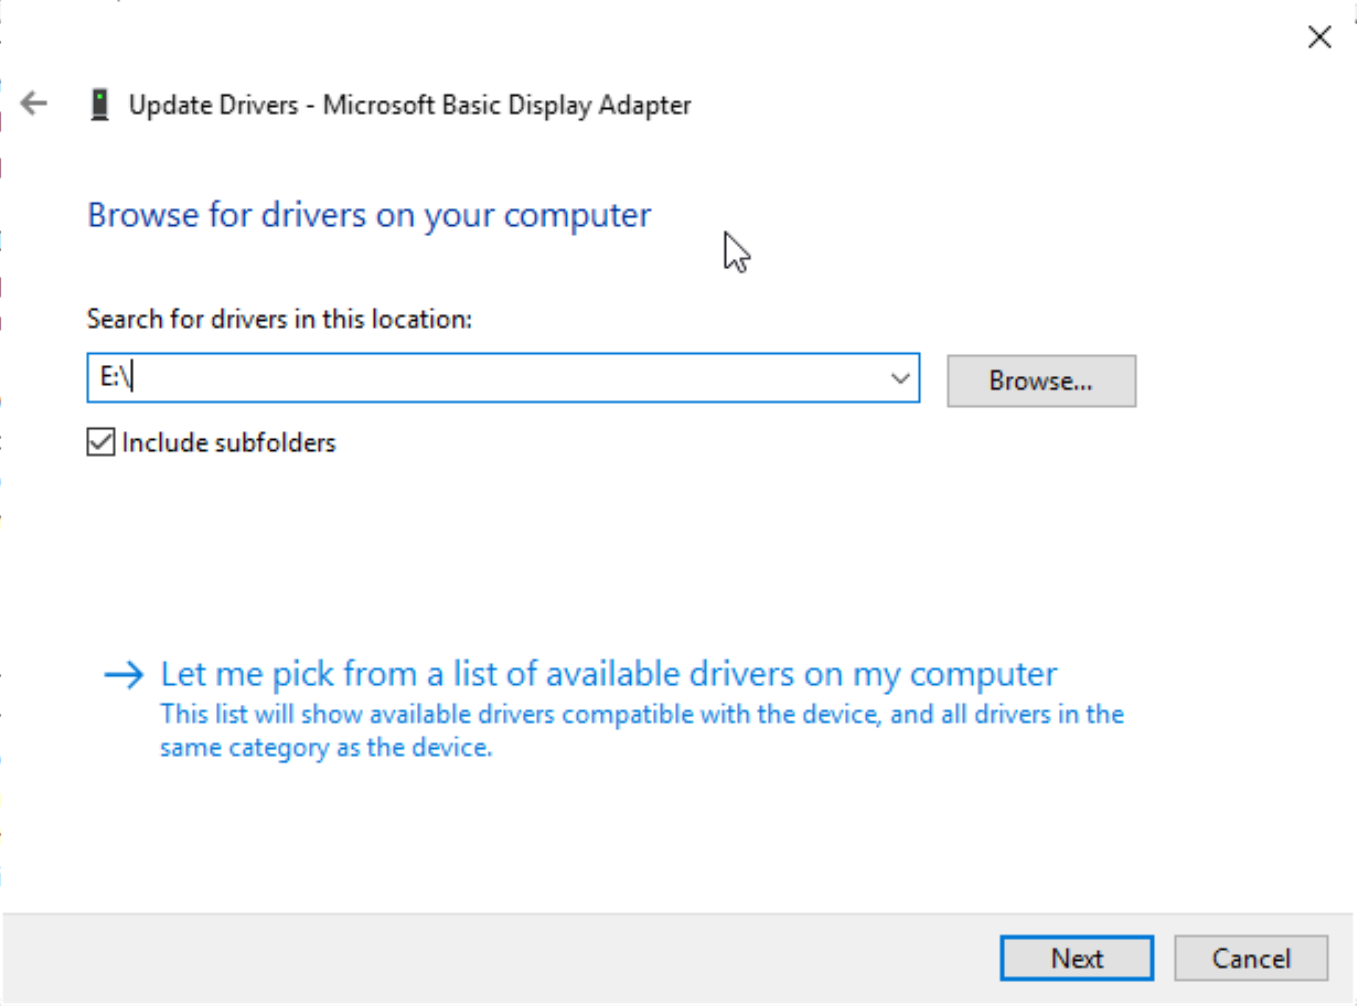
After selecting Custom, you be shown a screen where you can select the drive to install Windows to. Except, Windows can't find the drive. You'll need to load the driver.
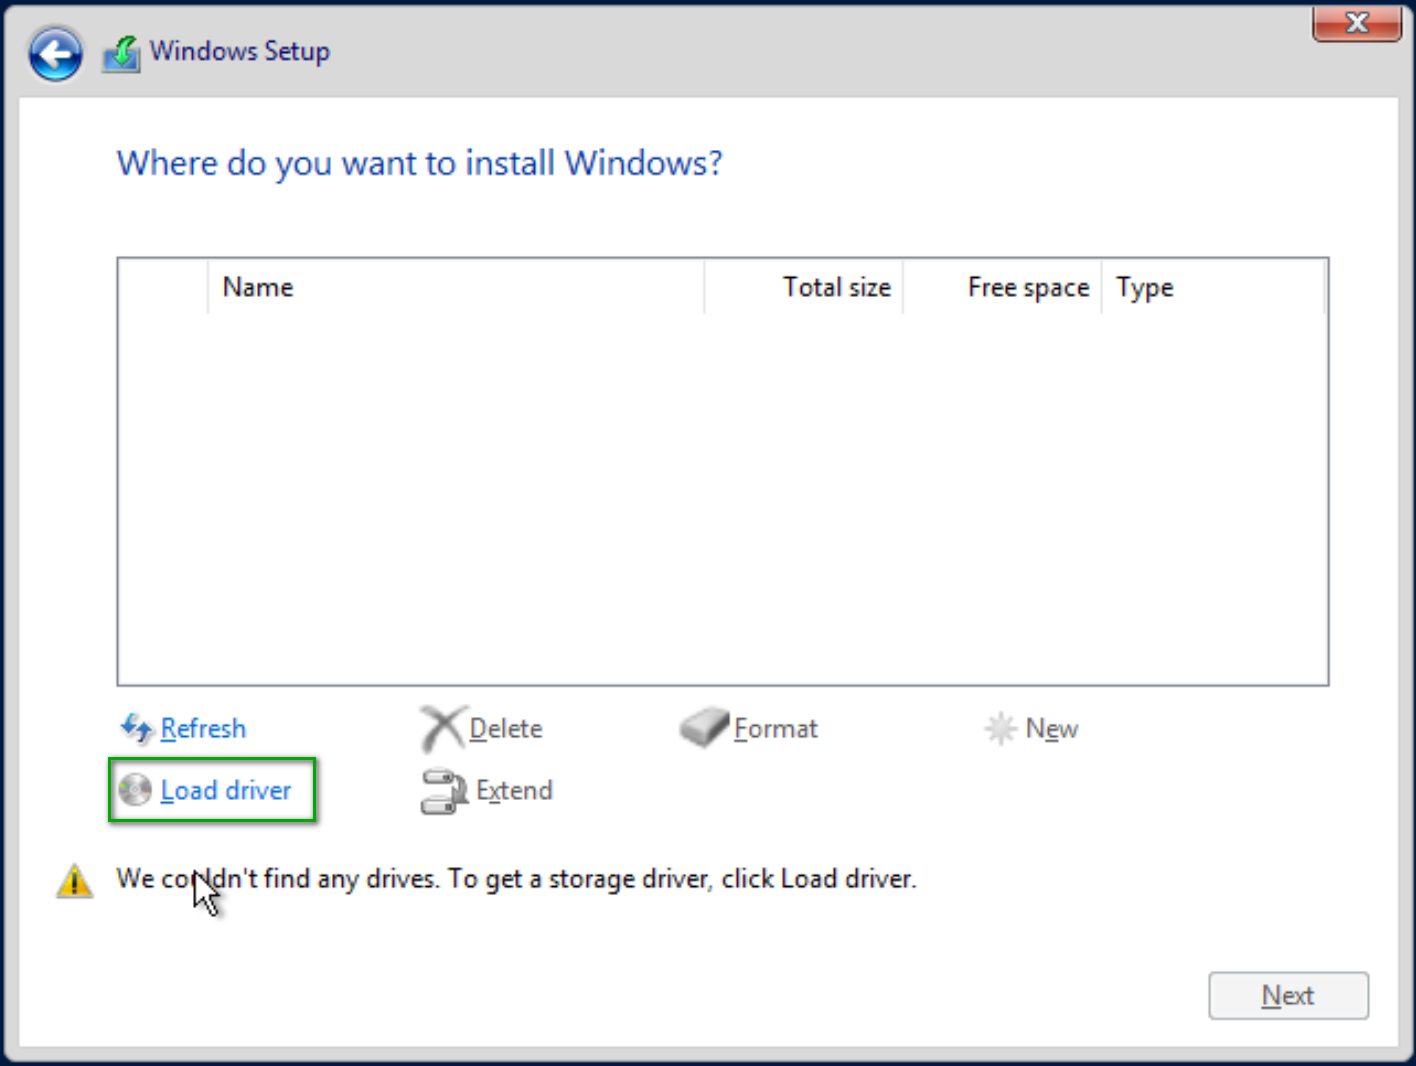
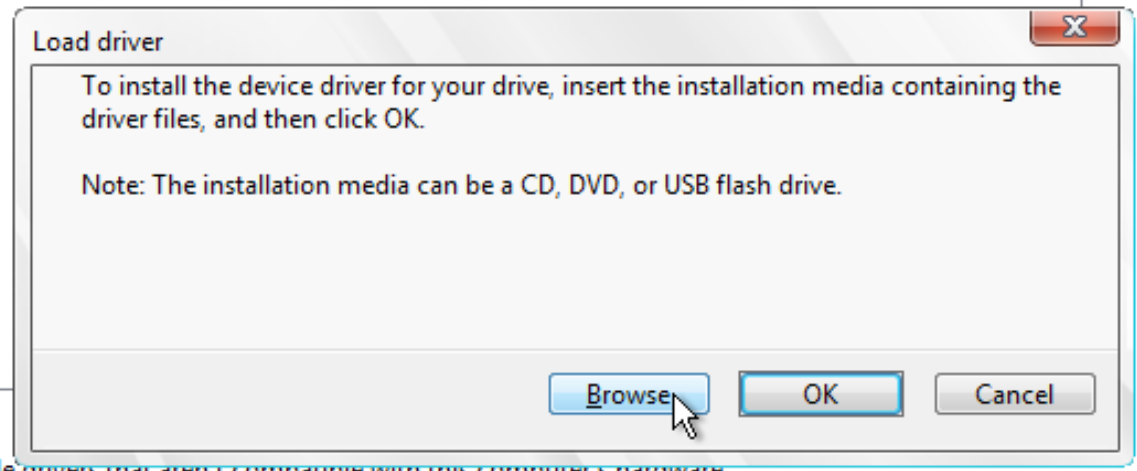
Select Browse on this screen.
Select E:\Viostar\2k16\amd64 if you are installing Windows Server 2016 or 2019. For Windows 10 select E:\viostar\w10\amd64. I don't know why x86 is still an option. Support for older hardware, I suppose.
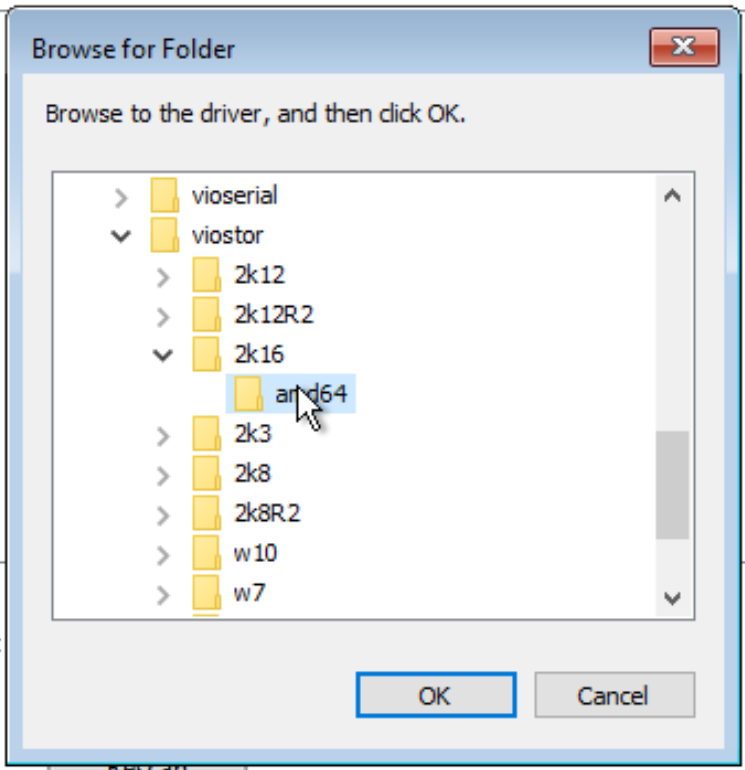
It should only take a second to find the driver. Click the next button.
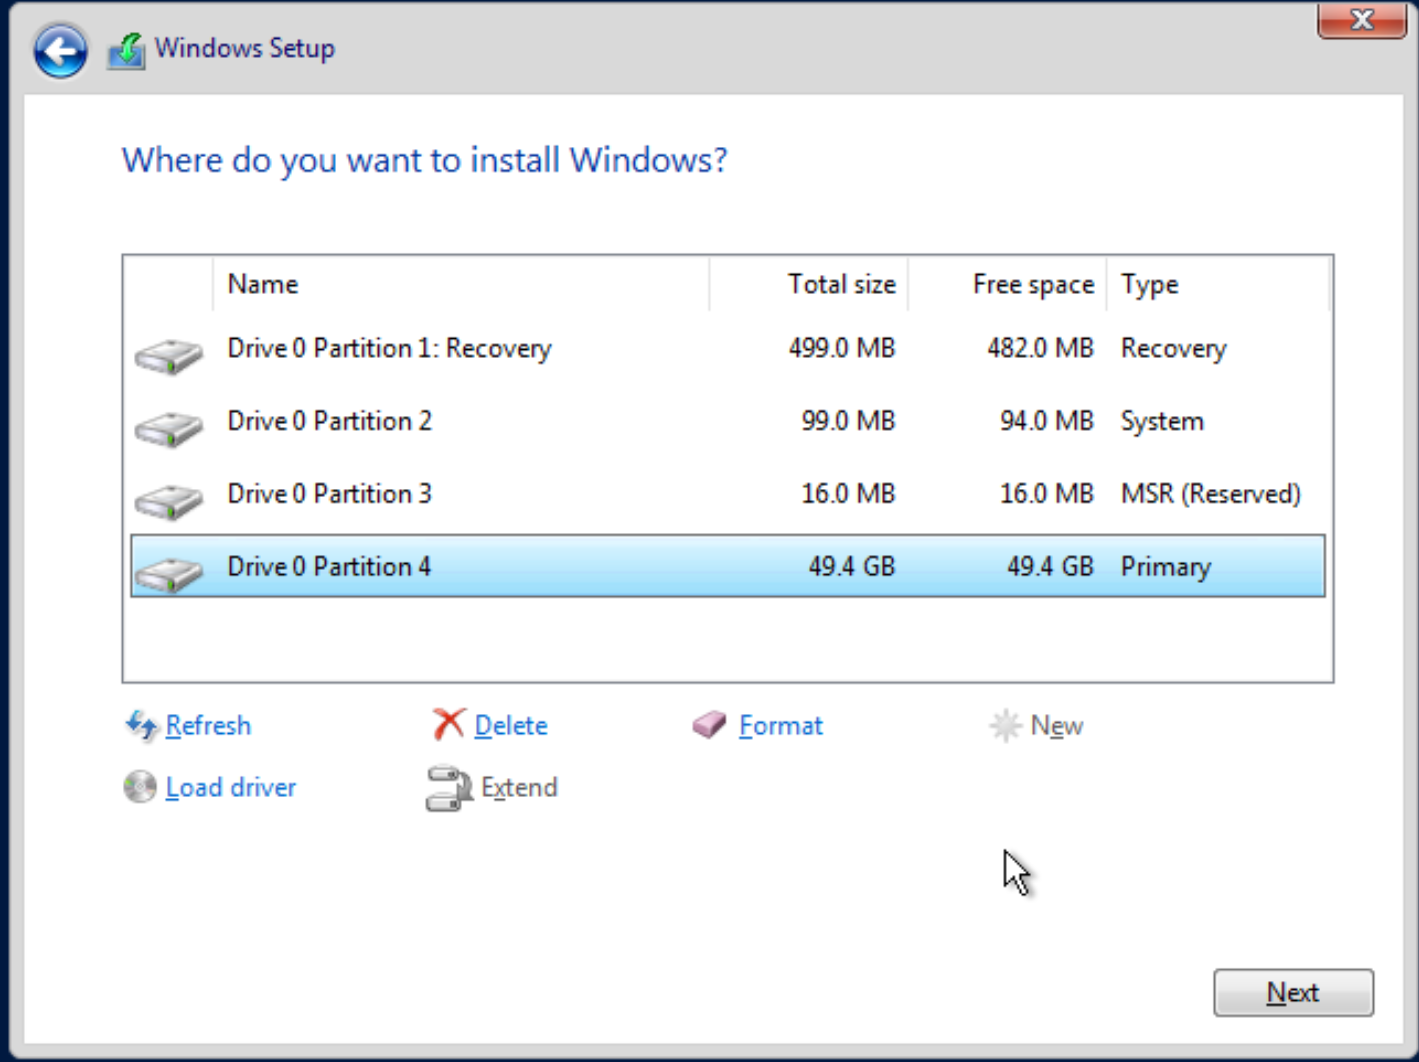
Now the drive should appear. Click the New button.
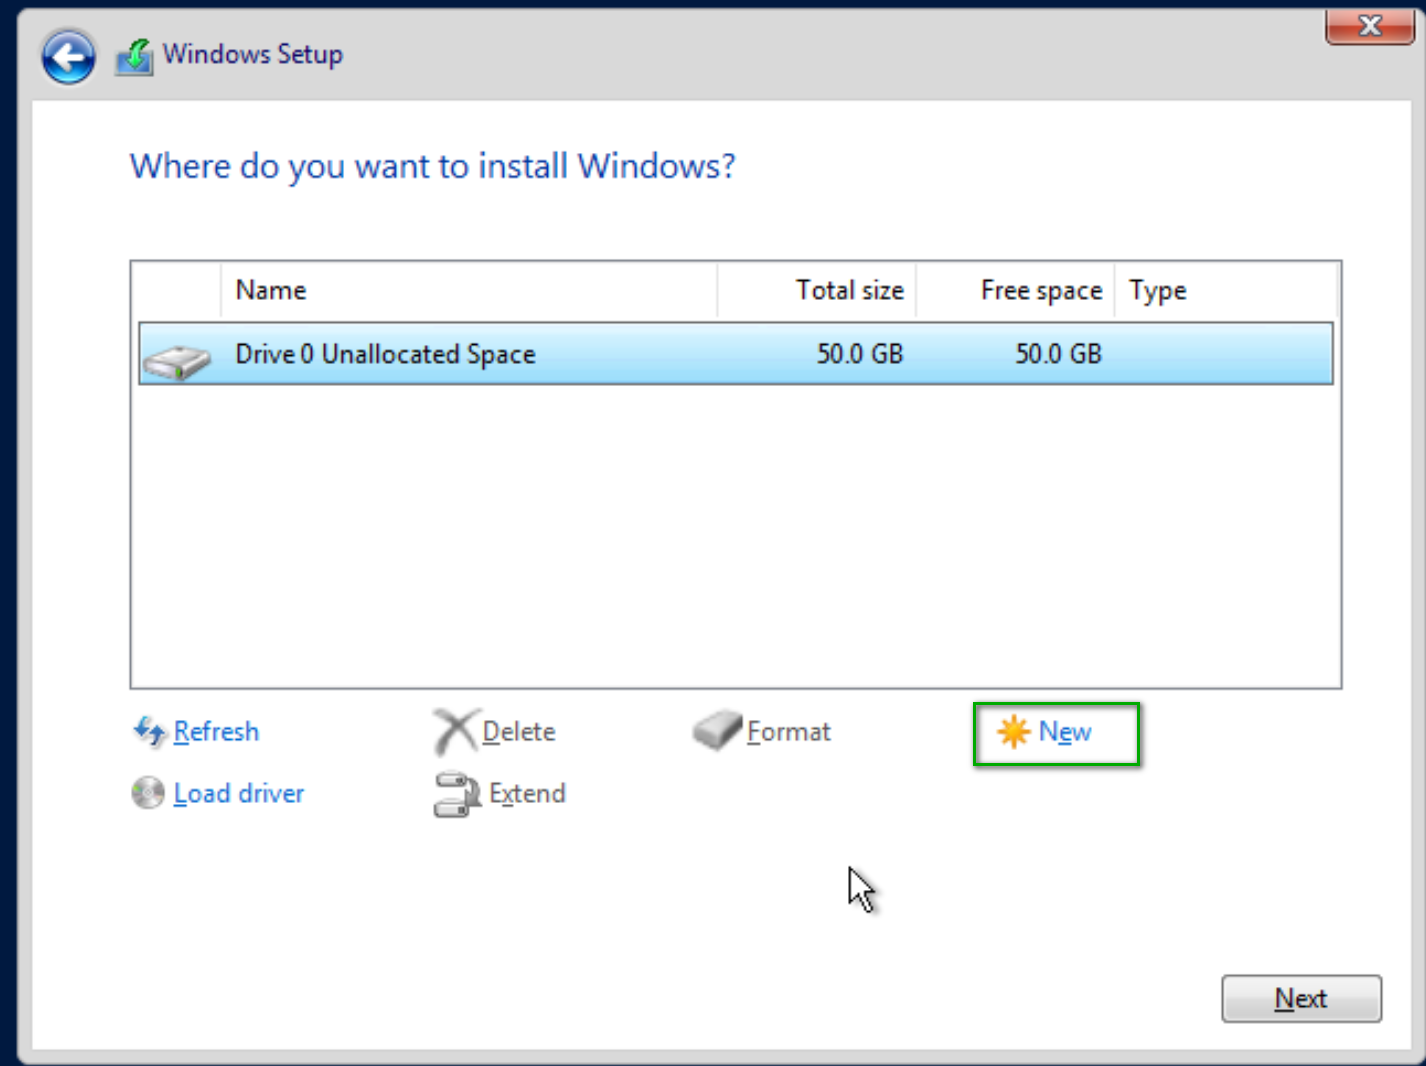
Follow the prompts and boom, you should have a formatted drive in a matter of seconds ready for Windows.
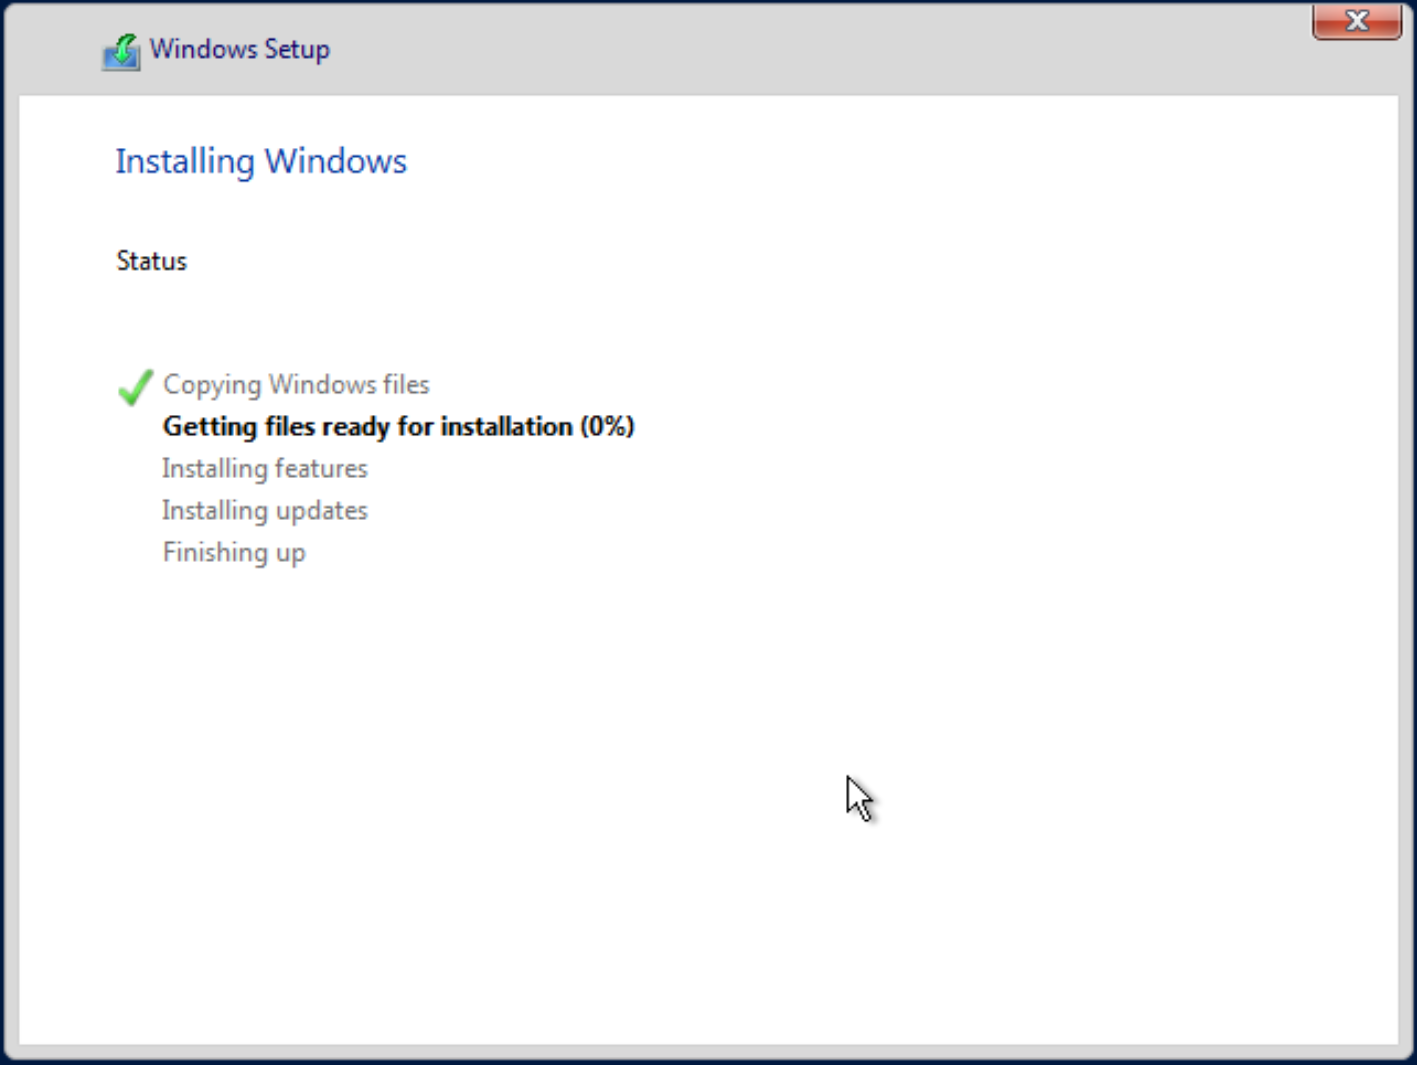
Now, just wait for Windows to finish doing its thing.
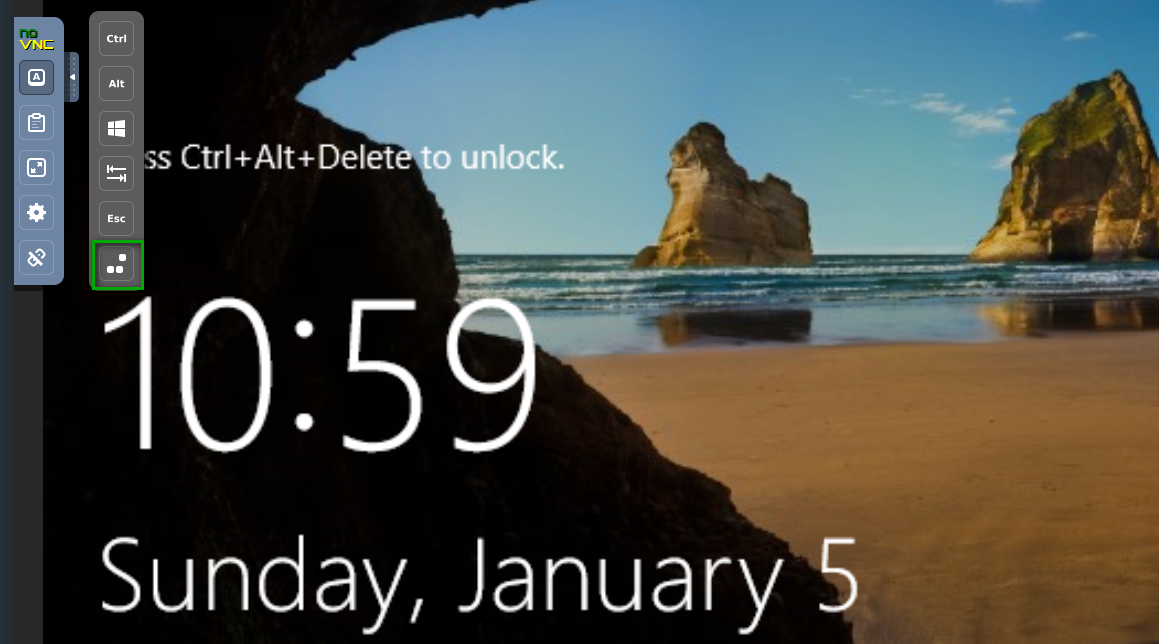
Once Windows has been installed, follow the wizard to get to the desktop. You will most likely be prompted to press Ctl+Alt+Del to get to the desktop. To do that, click the arrow on the left of the screen, click the A icon, and then click the highlighted button.
Once you are on the desktop, go to the device manager and update the driver for the following items.
- Ethernet Controller
- VirtIO
- VirtIO
- Display Driver (to get you out of the low-res display)
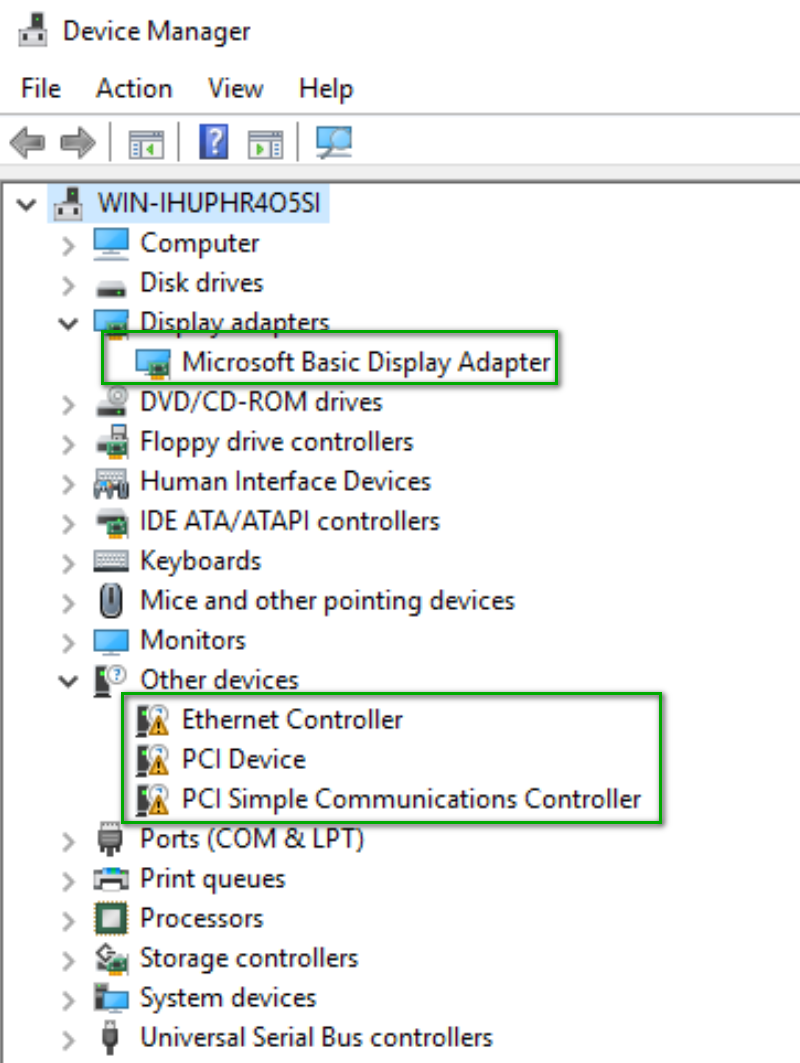
All the drivers can be found on the E:\ drive. No need to specify the folder, Windows will find the right driver.
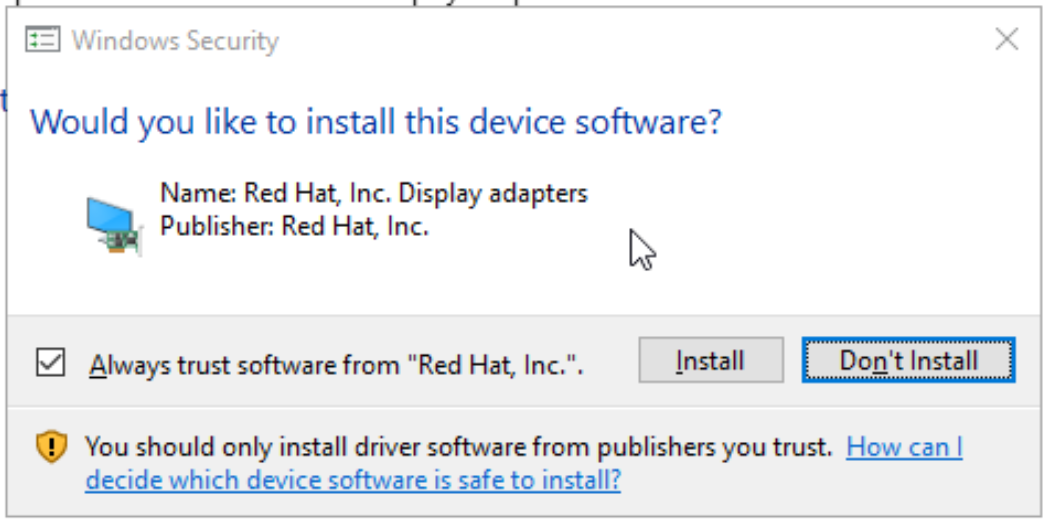
You'll be prompted to trust the drivers from Red Hat.
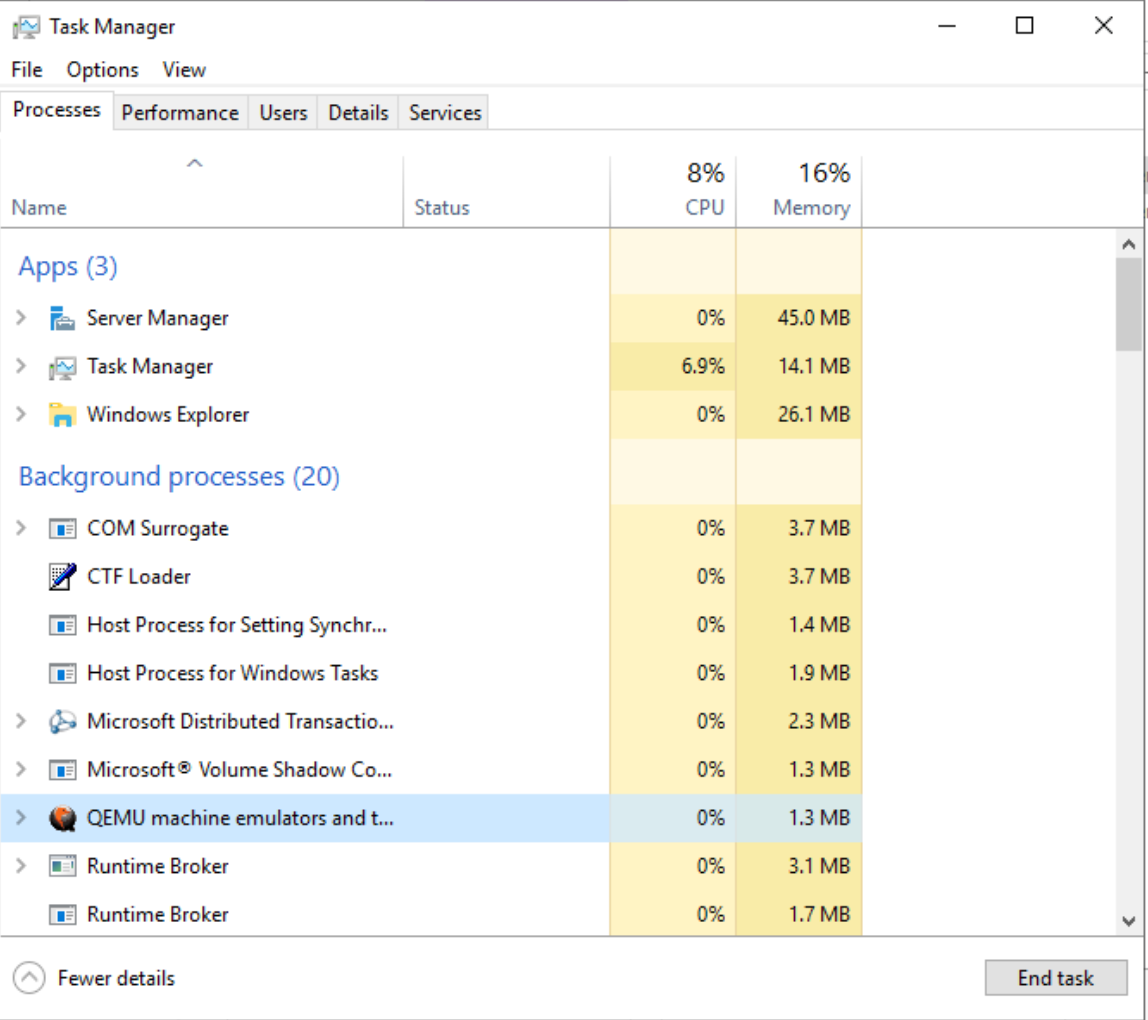
After those drivers have been updated, go to the e:\guest-agent folder and run the x64 MSI.

After that finishes running, you should see this service pop up in the task manager. That will enable the dynamic memory and for Unraid to be able to send restart and shutdown commands to the VM.
I typically will also configure:
- Timezone
- Windows Update settings
- Sleep settings (Windows 10 only, this is, so it doesn't go to sleep after 20 minutes)
- Rename the PC and attach it to the domain
- Enable Remote Desktop
The VM is all set to go now. Close the VNC remote and go back to the VM screen in Unraid. Stop the VM.
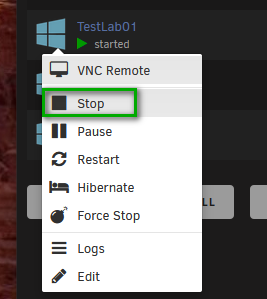
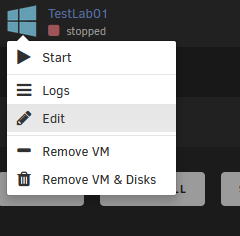
Once it has been stopped, click the Edit VM option.
Change the initial memory and max memory limits to your liking and then scroll down and click the Update button.
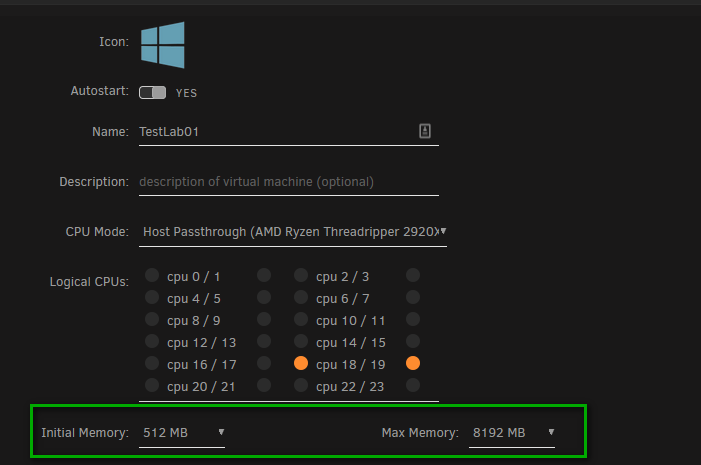
I like to experiment with it. If you set the memory to 1536 MB, but you always see it taking up 1536, then you've set the low too high. Start the VM and refresh the screen a few times. You should see the memory column fluctuate and then stabilize.
That's it! You now have a VM all configured and ready for use!
Conclusion
It has been fun learning how hypervisors work and how they share resources. My setup is a bit extreme because of my use case. I wouldn't expect most people to pay around $2700 for their home server. That is expensive but not as expensive as hosting everything in AWS, Azure, or GCP. If you are looking to get started, I wouldn't start with AMD Threadripper. Take a look at the new AMD Ryzen CPUs, specifically the 3600x (6 cores/12 threads), 3700x (8 cores/16 threads), 3900x (12 cores/24 threads), and 3950x (16 cores/32 threads). Get a good B450, X470, or X570 chipset ATX sized board with 4 DIMM Slots and at least 6 SATA ports to support future upgrades. Start small and then upgrade as you go.